
Lawn
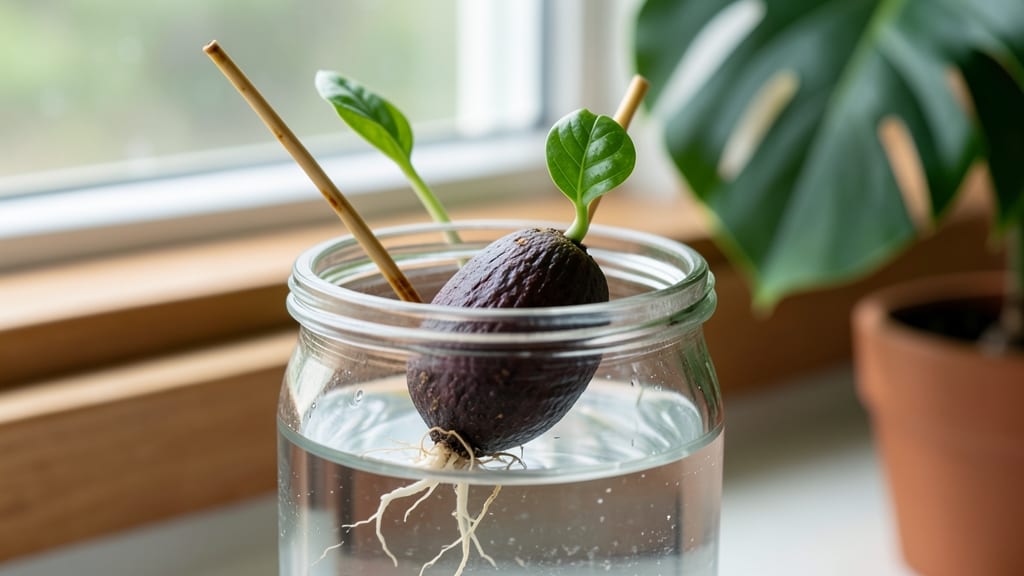
Growing an avocado plant from a seed with toothpicks feels like watching a tiny miracle unfold. 🌱 The toothpick method keeps the seed stable in water while roots sprout—no fancy equipment needed.
I’ve tried this with store-bought avocados (the pits are perfect) and always end up with a lush green plant within 6 weeks, even as a beginner. The secret lies in patience and consistency: fresh water, bright indirect light, and a little toothpick magic to keep the seed from rotting.
Most people quit too soon, but stick with it—those first roots are a game-changer. You’ll see them within 2-3 weeks, and by month two, you’ll be transplanting a sturdy seedling ready for soil.
Once transplanted, your avocado plant will reward you with glossy leaves and a slow but steady climb toward fruit-bearing potential. The key is keeping the soil moist (not soggy) and giving it a sunny spot—just like the tropical climates avocados love. Even if it grows slowly at first, that’s normal.
This method works year-round, indoors or out, and turns kitchen scraps into living decor. Here’s how to do it right the first time—no guesswork, just growth. Let’s get those roots growing!
📚 In This Guide
- What you need
- Instructions
- Tips and common mistakes
- Wrapping up and next steps
What you need
- ● 1 fresh avocado seed – Choose a seed from a ripe, organic avocado if possible for better germination.
- ● 3-4 wooden toothpicks – Standard size (e.g., 3.5 inches long) to secure the seed without piercing it.
- ● 1 clear glass or jar – At least 8-12 oz in size, with smooth sides for visibility (e.g., a mason jar or drinking glass).
- ● Water – Room-temperature, filtered or tap water (chlorine-free if possible).
- ● 1 small plate or saucer – To balance the glass and prevent spills.
- ● Food-safe marker – To label your glass with the planting date.
- ● Spray bottle – For gentle misting if the water level drops.
- ● Grow light or sunny windowsill – If your space lacks natural light.
- ● Potting soil & small pot – For transplanting once roots and sprouts appear.
- ● Humidity dome or plastic wrap – To create a mini greenhouse effect (especially useful in dry climates).
Step-by-Step instructions for growing avocado seeds in water
Here's how to turn your kitchen scraps into a thriving avocado plant with strong roots in just weeks.
🌱 Step 1: Prepare the Seed for Planting
Start by washing your avocado pit thoroughly under running water to remove any remaining fruit flesh. This prevents mold and bacteria from growing in your water. I like to scrub it gently with a soft brush—just enough to clean without damaging the seed's surface.
Next, insert 3 toothpicks evenly around the middle of the pit, about ¼ inch apart. These will suspend it over the water without letting it sit submerged. The goal is to keep the bottom half in water while the top stays dry. If the toothpicks slip, use a little hot water to soften them slightly before inserting.
Here's the thing—don't rush this step. The toothpicks need to be placed just right so the seed stays balanced. If it wobbles too much, your water levels will fluctuate, and the seed might dry out or rot. Test the balance by gently placing it in your glass before committing to the final setup.
💧 Step 2: Set Up the Water Container
Fill a clear glass or jar with enough water to cover about 1 inch of the seed's bottom. I use a glass that's at least 6 inches tall so the roots have room to grow downward without crowding. Change the water every 2-3 days to prevent bacterial growth—stagnant water smells sour and can rot your seed before it even sprouts.
Place your toothpick-suspended seed in the water, ensuring only the bottom portion is submerged. The top half should remain completely dry. You'll see condensation form on the seed's surface at first—that's normal and just means it's adjusting to the humidity. If you notice mold forming on the water's surface, dump it and start fresh with clean water.
Position the glass in a warm spot with bright, indirect light. A south-facing window works great, but avoid direct sunlight, which can overheat the water and cook the seed. You'll know the light is right when the seed feels warm to the touch but not scorching.
⏰ Step 3: Monitor and Maintain Germination Conditions
Check your seed daily for signs of root growth, which typically appears within 2-6 weeks. You'll see a small white root emerge first, followed by a second root branching off. This is your signal that germination is underway! Keep the water level consistent—never let it drop below ½ inch coverage of the seed's bottom.
Once roots reach about 2 inches long, it's time to encourage the stem to sprout. I like to tilt the seed slightly so the top half dries out a bit—this tricks it into sending up a shoot. You might see a tiny green shoot emerge from the top within 1-2 weeks. If the water gets cloudy or smells bad, dump it and refill with fresh water immediately.
This is the moment that matters: when the stem reaches 3-4 inches tall, your seedling is ready to transition to soil. Don't wait too long—roots that grow too long in water become weak and brittle when transplanted. You'll know it's ready when the stem is sturdy enough to hold itself upright.
🌿 Step 4: Transition to Soil
Prepare a small pot with well-draining potting mix—I recommend a blend of 50% potting soil and 50% perlite to prevent root rot. Fill the pot to 1 inch below the rim and make a small hole in the center with your finger. Gently place the seedling into the hole, ensuring the roots are covered but the base of the stem remains just above soil level.
Water lightly to settle the soil around the roots, but don't drench it. Overwatering at this stage is the fastest way to kill your young plant. Place the pot in a spot with bright, indirect light and keep the soil consistently moist but not soggy. You'll see new leaves emerge within 2-4 weeks—that's your signal everything is working.
Real talk: the first few weeks in soil are critical. If the leaves start yellowing, it's usually a sign of overwatering. Let the top inch of soil dry out between waterings, and you'll avoid this common pitfall. With patience, your avocado seedling will grow into a healthy plant that can live for years!
Tips & tricks for growing avocado seeds in water
These simple tricks will help your avocado seed grow strong roots and a healthy sprout in no time.
Toothpick Placement Matters: When inserting your 3 toothpicks in Step 1, aim for perfect balance—this is the foundation for consistent water levels. I like to use wooden toothpicks because they're sturdy and won't corrode in water. If your seed wobbles, gently adjust the toothpicks until it sits level when placed in your glass. Uneven placement can cause one side to dry out while the other rots.
Water Quality is Critical: The instructions mention changing water every 2-3 days, but here's what nobody tells you—use filtered or bottled water if possible. Tap water often contains chlorine that can inhibit root growth. I've noticed my seeds develop stronger roots when using distilled water, though regular tap water works fine if you let it sit out for 24 hours to off-gas chlorine first. Cloudy or moldy water is a red flag—dump it immediately and start fresh.
Light Positioning Secrets: That bright, indirect light in Step 2 is key—here's how to get it right. Position your glass so the seed gets morning sun but afternoon shade. I place mine on a windowsill facing east, then rotate it slightly each day to prevent one-sided growth. You'll know it's working when you see condensation forming on the seed's surface—this means it's getting just the right amount of warmth without overheating.
Root Growth Milestones: When checking for root growth in Step 3, look for these visual cues: first, a tiny white nub appears, then it grows into a thick root about 2 inches long. At this stage, I like to gently wiggle the seed—if the roots feel strong and don't pull out easily, they're ready for the next phase. The second root usually appears within 1-2 weeks of the first, signaling your seed is actively growing. Remember to keep the water level at least ½ inch covering the bottom—this prevents roots from drying out.
Pro Tips for Avocado Seed In Water With Toothpicks
- These simple tricks will help your avocado seed grow strong roots and a healthy sprout in no time.
- Toothpick Placement Matters: When inserting your 3 toothpicks in Step 1, aim for perfect balance—this is the foundati...
- Water Quality is Critical: The instructions mention changing water every 2-3 days, but here's what nobody tells you—u...
Frequently asked questions
Got questions about growing avocado seeds in water with toothpicks?
You're not alone! Here are some of the most common queries—and their straightforward answers—to help you succeed.
How long does it take for avocado seeds to sprout roots in water?
With patience, you’ll typically see tiny white roots within 2–4 weeks. Stronger, more noticeable roots (1–3 inches long) usually appear in 4–6 weeks. Keep the seed in warm water (70–80°F) and change it every 2–3 days to speed up germination.
What if my avocado seed isn’t sprouting after 6 weeks?
Don’t panic! Some seeds take up to 8 weeks or longer. Check these first:
- Water quality: Use room-temperature, filtered water—chlorine or cold water can slow growth.
- Toothpick placement: Ensure they’re not too tight (leave a tiny gap for air circulation).
- Light exposure: Place near a bright window (but avoid direct sun, which can overheat the water).
- Seed viability: If the seed is shriveled or moldy, it may not sprout—try another!
Can I plant the avocado seed directly in soil without water germination?
Yes, but success rates drop! Water germination weakens the seed’s defenses, making it more vulnerable to rot in soil. If you skip the water step:
- Soak the seed in water for 24–48 hours first to soften the shell.
- Plant the flat side down in moist, well-draining soil (mix sand for aeration).
- Keep soil consistently damp (not soggy) and in warmth (70–80°F).
Pro tip: Cover the pot with plastic wrap to retain humidity until sprouts appear!
Is it safe to eat the avocado after using its seed for germination?
The seed contains no toxins for the fruit itself. Just wash the avocado thoroughly before eating. However, avoid eating the seed—it’s bitter and hard to digest. Save it for your green thumb project!
What can I do if mold grows in the water?
Mold is a red flag—act fast!
- Drain and rinse the seed with clean water.
- Trim any discolored or fuzzy roots with sterilized scissors.
- Replace the water with fresh, warm, filtered water.
- Add a drop of hydrogen peroxide (3%) to the water for 10 minutes to kill mold spores (rinse well after).
If mold persists, start over with a new seed—safety first!
Wrapping up and next steps
Growing an avocado seed in water with toothpicks is a rewarding and simple way to nurture life from something as humble as a pit! 🌱 With patience and care, you’ll witness roots and a tiny sprout in just 6 weeks, proving that nature’s magic is always within reach.
Whether you’re a gardening newbie or a green thumb looking for a fun project, this method is your ticket to a thriving plant—so grab those toothpicks and get ready to watch your little seed transform!
Ready to take the next step? Once your avocado seedling is rooted, transplant it into soil and keep nurturing it with love (and maybe a sunny windowsill!). Who knows? You might just grow a lush, fruit-bearing tree someday. Happy planting! 🌿✨