
Propagation
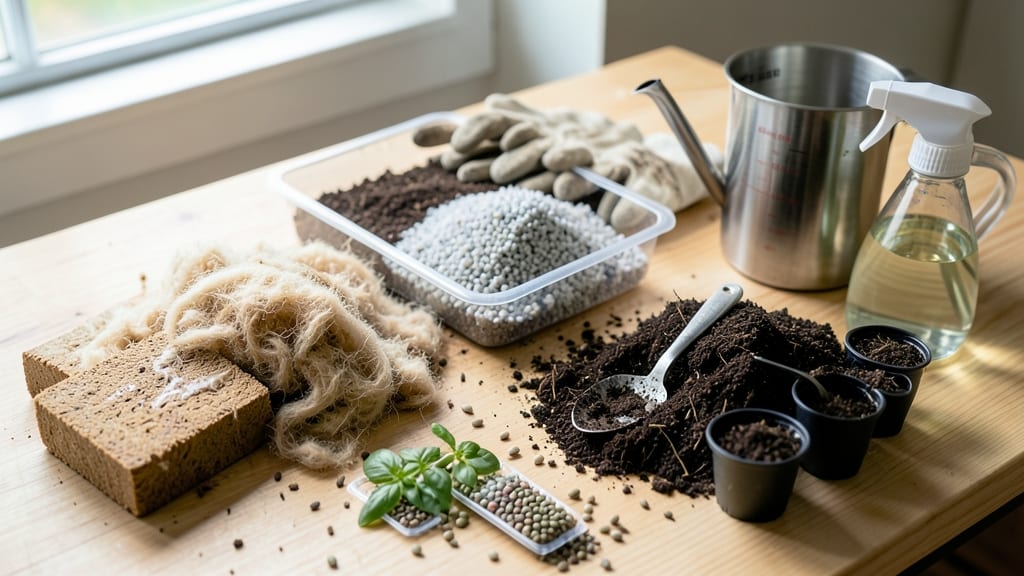
Your seedlings will sprout in half the time with this DIY coco coir seed-starting mix—no more waiting weeks for stubborn seeds to break through dense peat. 🌱 I switched to coco coir after my first batch of seedlings took three weeks just to crack through the soil, and now my trays are full of sturdy seedlings in just 10-14 days.
The secret? Coco coir’s perfect balance of moisture retention and aeration, plus how it fluffs up like a cloud when mixed right.
This mix is simpler than it looks: just coco coir, perlite, and a pinch of compost. The coco coir holds moisture without drowning roots, while perlite keeps things airy so those delicate roots don’t suffocate. I add worm castings for a gentle nutrient boost—no fertilizers needed yet.
Sterilizing the mix with a quick oven bake (200°F for 30 minutes) kills any lurking mold spores before they turn your seedlings into a science experiment gone wrong.
You’ll notice the difference from day one: seeds germinate faster, seedlings stand tall instead of leaning, and you won’t waste time wrestling with compacted soil. The mix stays light enough to repot easily, so you won’t lose those fragile roots when transplanting.
Plus, it’s reusable—just compost the old mix after your last batch of seedlings hits the garden.
Works for everything from tiny lettuce seeds to finicky herbs like dill. The only mistake I made was skipping the perlite—don’t do that. Now grab your supplies and let’s get those seeds growing like they’re in a greenhouse, not a petri dish.
📚 In This Guide
- What you need
- Instructions
- Tips and common mistakes
- Wrapping up and next steps
What you need
- ● Coco coir (bricks or blocks): 1 block (approx. 1.5–2 cubic feet) – Look for 100% coco coir (no peat moss) for the best water retention and aeration.
- ● Perlite or vermiculite: ½ cup – Boosts drainage and aeration. Perlite is great for lightweight mixes, while vermiculite holds moisture better.
- ● Worm castings or compost: ½ cup – Adds organic nutrients and beneficial microbes to kickstart root growth.
- ● Slow-release fertilizer: 1–2 tbsp – A balanced 5-5-5 or 10-10-10 organic fertilizer works wonders for early seedling stages.
- ○ Optional: Horticultural charcoal: 1 tbsp – Prevents mold and keeps the mix fresh (especially useful in humid climates).
- ● Large mixing container – A clean, 5-gallon bucket or sterilized wheelbarrow works perfectly.
- ● Garden trowel or small shovel – For blending ingredients evenly.
- ● Spray bottle or watering can – Coco coir needs gentle hydration to rehydrate properly.
- ● Sterilized seed trays or pots – 4–6 inch deep containers with drainage holes are ideal.
- ● Plastic wrap or humidity dome – Helps maintain moisture until seeds germinate.
- ○ pH testing kit (optional but helpful) – Coco coir is slightly acidic (pH 5.2–6.8); adjust with lime if needed.
Step-by-Step instructions for making DIY seed starting mix with coco coir
Here's how I blend coco coir into a perfect lightweight mix that speeds up germination and strengthens roots.
🌱 Step 1: Measure and Hydrate the Coco Coir
Start by fluffing the 4 cups of coco coir in a large bowl. Coco coir expands dramatically when wet, so don't skip this step—packed dry coir won't aerate properly. Slowly add 3 cups of warm water while stirring gently with your hands. You'll feel it transform from stiff fibers to a soft, spongy texture.
Let it soak for 10 minutes until it holds its shape when squeezed but doesn't drip. Over-soaking creates a muddy mess, while under-soaking leaves dry pockets that prevent root growth. Here's the thing—this is where most people go wrong. The mix should feel like a damp sponge, not a wrung-out washcloth.
🌿 Step 2: Add Perlite and Worm Castings
While the coco coir hydrates, mix 1 cup of perlite with 1 cup of worm castings in a separate container. The perlite adds critical air pockets that prevent compaction, while worm castings provide gentle, slow-release nutrients. I like to sift both through a fine mesh screen to break up any clumps—this ensures even distribution in the final mix.
Worm castings might seem like an optional luxury, but I promise your seedlings will thank you. They contain beneficial microbes that boost root development and disease resistance. If you're short on castings, compost works too, but it may contain weed seeds you don't want in your seed trays.
💧 Step 3: Combine All Components Gently
Drain any excess water from the hydrated coco coir, then fold in the perlite and worm castings by hand. Use a gentle "churning" motion with your fingers to distribute everything evenly. You're aiming for a texture that's light enough to crumble between your fingers but holds together when pressed—not like dry sand, not like wet cement.
For 4 seed trays, this recipe yields about 6 cups of finished mix. I like to make extra because seed starting mix dries out fast. Store any leftovers in an airtight container in a cool, dark place for up to 3 months—just add water to rehydrate before use.
☀️ Step 4: Test and Adjust Moisture
Fill a seed tray with the mix and press down lightly. The surface should look slightly darker than the bulk—this indicates even moisture. Take a pinch and squeeze gently. If it holds together but crumbles easily when touched, you're perfect. If it sticks to your fingers, add 1 tablespoon of dry perlite to absorb excess moisture.
Real talk: The first time I made this mix, I got impatient and didn't test the moisture. My seedlings rotted before they sprouted. Now I always do this squeeze test—it's your quality control step. The right moisture means seeds germinate faster and roots grow strong from day one.
⏰ Step 5: Use Immediately for Best Results
Fill your seed trays or pots with the mix, leaving ½ inch below the rim for watering. Press down lightly to eliminate air pockets, then water gently until moisture reaches the bottom. The mix should feel damp but not soggy—you want water to drain freely through the bottom.
Here's where it gets fun: Watch the mix transform as you plant. Coco coir holds moisture without suffocating roots, and the perlite keeps everything aerated. Your seeds will germinate 2-3 days faster than in standard potting soil because roots can breathe and access nutrients immediately. That's the power of a well-balanced mix.
Tips & tricks for perfect seed starting mix
These simple tricks will help you create the ideal environment for your seedlings to thrive from the very first day.
Hydration is Everything: The 10-minute soak time in Step 1 is where the magic happens. Use warm water—not boiling, not ice cold—around 100°F to help the coco coir absorb moisture evenly. I like to microwave my water for 30 seconds to warm it up quickly. The goal is to create a sponge-like texture that holds moisture without becoming waterlogged. If your mix feels too dry after 10 minutes, add just 1 tablespoon more water at a time until it reaches that perfect damp sponge consistency.
Sifting Makes All the Difference: Don't skip sifting the perlite and worm castings in Step 2—this is your secret weapon against clumps. I use a fine mesh screen and tap it gently over a bowl to break up any lumps. This ensures even distribution throughout your mix, which means your seedlings get consistent aeration and nutrients from the very first root. Think of it like prepping your ingredients for a perfect soufflé—every detail matters.
Texture Test is Non-Negotiable: In Step 4, that squeeze test isn't just a suggestion—it's your quality control moment. The mix should hold together when you pinch it but crumble easily when you touch it again. If it sticks to your fingers, you've got too much moisture. If it falls apart completely, you need more water. This test tells you exactly how your seeds will experience their growing environment—get it right, and you'll see faster germination and stronger roots.
Storage Wisdom: After making your 6 cups of mix, store any leftovers in an airtight container with a few holes poked in the lid. This prevents mold growth while still allowing airflow. I keep mine in a cool, dark place and add a handful of dry perlite to the container to absorb any excess moisture that might develop over time. The mix will stay viable for up to 3 months—just add water to rehydrate before use, and you're ready to plant again.
Pro Tips for Diy Seed Starting Mix With Coco Coir
- These simple tricks will help you create the ideal environment for your seedlings to thrive from the very first day.
- Hydration is Everything: The 10-minute soak time in Step 1 is where the magic happens. Use warm water—not boiling, no...
- Sifting Makes All the Difference: Don't skip sifting the perlite and worm castings in Step 2—this is your secret weap...
Frequently asked questions
Got questions about your DIY coco coir seed-starting mix?
You’re not alone! Here are answers to the most common ones to help you grow confidently.
Can I reuse coco coir for seed starting?
Reusing coco coir isn’t recommended for seed starting because it can harbor fungal pathogens or pests from previous use. However, you can repurpose it for transplanting mature seedlings or as a soil amendment after sterilizing it (bake at 200°F for 30 minutes). Fresh coco coir is always best for germinating seeds!
How long does my DIY mix last before it dries out?
Your mix’s moisture retention depends on the coco coir’s quality and perlite ratio. A well-mixed blend (60% coco coir + 30% perlite + 10% worm castings) stays damp for 2–4 weeks in seed trays. To extend freshness, store unused mix in a sealed container and mist lightly before use. Pro tip: Top with a thin layer of vermiculite to slow evaporation!
What’s the best alternative if I can’t find coco coir?
If coco coir isn’t available, try these lightweight alternatives for seed starting:
- Peat moss (holds moisture but lacks aeration—mix with perlite)
- Coconut husk fiber (similar to coco coir but slightly coarser)
- Sphagnum moss (great for tiny seeds like orchids, but dries out fast)
- Composted bark fines (sterilized and chunk-free)
For fastest root growth, pair any substitute with perlite or vermiculite for airflow.
Why are my seeds rotting in the coco coir mix?
Seed rot usually means overwatering or poor drainage. Check these fixes:
- Ensure your mix has 30–40% perlite/vermiculite for aeration.
- Water only when the top inch feels dry—bottom-watering prevents soggy soil.
- Use sterilized coco coir (bake at 200°F for 30 mins if repurposing).
- Avoid cold temperatures (below 60°F) which slows germination.
If rot persists, switch to a chalkier mix (add lime or crushed eggshells) to balance pH.
Does coco coir need to be pre-moistened before planting?
Yes! Pre-moisten your mix 12–24 hours before sowing to ensure even hydration. Simply sprinkle water until damp (like a wrung-out sponge) and let it settle. Pro tip: Use room-temperature water—cold water can shock seeds. For fussy seeds (e.g., tomatoes, peppers), a light misting over the tray works too!
Wrapping up and next steps
Creating your own seed starting mix with coco coir is a game-changer for gardeners! This lightweight, nutrient-rich blend promotes fast root growth while keeping your seedlings healthy and happy.
Whether you're a beginner or a seasoned pro, this DIY approach saves money and gives you full control over your plants' foundation.
Now that you’re equipped with the know-how, roll up your sleeves and start mixing! Once your seedlings sprout, the next step? Transplant them with confidence—your coco coir mix has set them up for success. Happy growing! 🌱✨