
Lawn
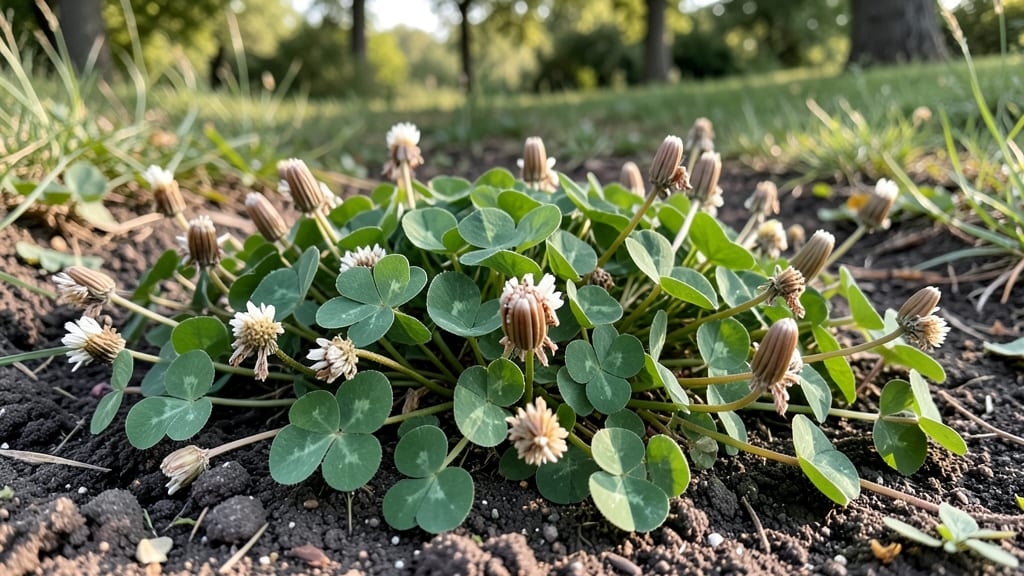
Clover seed heads turn your lawn into a self-sustaining seed bank—no twisting, no fuss, just nature doing the work. 🌿 I’ve watched white clover transform patches of grass into fluffy seed clouds, and once you see it, you’ll never look at those little pods the same way again.
The secret lies in letting the plants flower undisturbed, which means resisting the urge to mow until after the seeds mature.
The timing is everything: wait until the seed heads turn from green to pale tan, then harvest on a dry day when the pods are ready to release. You’ll need a bucket, scissors, and patience—no special tools, just a willingness to let clover do its thing.
These seeds are tough, storing well for years if kept dry, so you’re not just saving seeds—you’re building a garden legacy.
What you’ll end up with is a stash of viable seeds that sprout reliably, ready to scatter across new lawns or garden beds. The plants thrive in poor soil, drought, and foot traffic, making clover a perfect choice for low-maintenance areas.
Plus, the flowers attract pollinators all season long—it’s a win-win for your yard and the local ecosystem.
Whether you’re restoring a worn-out lawn or stocking up for next year’s planting, clover seed heads are the ultimate hands-off solution. No digging, no fuss—just let the plants do their magic, and you’ll have seeds for years to come. Here’s how to make the most of them without the hassle.
📚 In This Guide
- What you need
- Instructions
- Tips and common mistakes
- Wrapping up and next steps
What you need
- ● Gather these materials and tools to start your hands-off clover seed-saving adventure—no twists or tangles required! 🌱✨
- ● Pro tip: Harvest seed heads on a dry, sunny day—this ensures pods are fully mature and less prone to mold. 🌞💡
How to harvest clover seed heads without the twist
Skip the tangled mess—here’s how to collect clover seeds cleanly, efficiently, and without wrestling with stubborn pods.
🌱 Step 1: Identify and Wait for Mature Seed Heads
Clover seed heads are ready when the pods turn from green to a tan or light brown color and begin to split open slightly along the seams. You’ll notice the flowers have dried up completely, and the pods look papery rather than plump. I always check in late summer or early fall, depending on your climate—mid-September to October works best in most regions.
Don’t rush it. If you harvest too early, the seeds won’t be fully developed, and you’ll end up with low germination rates. Give the pods time to fully mature, even if that means waiting a few extra weeks. A gentle tug on a pod should release seeds easily—if it resists, it’s not ready yet.
☀️ Step 2: Choose the Right Time of Day for Collection
Harvest clover seed heads on a dry, sunny morning after any morning dew has evaporated. This ensures the pods are crisp and less likely to stick together. I avoid harvesting after rain or in damp conditions—wet pods can mold or clump together, making seed extraction frustrating.
Cut the seed heads with clean scissors or pruning shears (about 6 inches of stem is enough), leaving the plant intact for future regrowth. Place the cuttings in a brown paper bag or breathable mesh bag immediately to prevent moisture buildup. This step is crucial for keeping the seeds dry and preserving their viability.
🪴 Step 3: Dry the Seed Heads Thoroughly
Spread the seed heads out in a single layer on a clean, dry surface—like a baking sheet or cardboard tray—where they can air-dry for 3-5 days. Choose a spot with good airflow but no direct sunlight, which can overheat and damage the seeds. I like to place mine on a windowsill with indirect light or in a well-ventilated garage.
Check daily for dryness by gently pressing a pod between your fingers. If it crumbles easily and the seeds rattle inside, they’re ready. If not, give them another day or two. Over-drying can happen, but it’s less common—just keep an eye on them to avoid losing your harvest.
✂️ Step 4: Extract Seeds Without the Twist
Once the pods are completely dry, place them in a clean, dry container (like a mason jar or small bowl) and gently rub or roll them between your palms. The pods will naturally split open, releasing the seeds. I find that rolling them on a flat surface works best—just tilt the container and let gravity do the work.
Sift the mixture through a fine-mesh sieve or strainer to separate seeds from chaff and pod fragments. Discard any debris, then store the clean seeds in a paper envelope or airtight container in a cool, dark place. Label it with the date and variety—clover seeds stay viable for 2-3 years if stored properly.
💧 Step 5: Store and Test for Viability
Before storing, perform a quick float test to ensure your seeds are viable. Fill a bowl with water and drop a handful of seeds in—good seeds sink, while empty or damaged ones float. Remove the floaters and discard them. This simple test saves you from planting low-quality seeds later.
Store the seeds in a paper envelope (not plastic, which traps moisture) in a cool, dry place like a pantry or seed drawer. Check them periodically for pests or mold. If stored correctly, your clover seeds should remain ready for planting next season—no tangled pods, no wasted effort.
Tips & tricks for perfect clover seed harvesting
These simple tricks will help you avoid the tangled mess and get the cleanest, most viable seeds every time.
Timing is Everything: In Step 1, when checking for maturity, look for pods that easily release seeds with a gentle tug. If they resist, they're not ready yet—this is the most common mistake I see. The tan or light brown color is your best indicator, but the tug test is foolproof. I've learned the hard way that harvesting too early means low germination rates, so patience pays off here.
Drying Strategy: During Step 3, the 3-5 day drying time can feel like forever, but this is critical for seed viability. Place your drying tray near a fan for faster airflow without direct sunlight. I've had the best luck with a small oscillating fan set on low—it speeds up drying by about 24 hours while preventing overheating. Check daily by pressing a pod; if it crumbles easily, your seeds are ready.
Extraction Hack: For Step 4, the rolling technique works best when you tilt the container at a 45-degree angle on a hard surface. This lets gravity help separate seeds from pods without crushing them. I use a glass baking dish because it's non-porous and easy to clean. After rolling, give the container a few gentle taps to release any stubborn seeds stuck in crevices.
Storage Wisdom: In Step 5, the float test is your quality control—don't skip it! I've saved myself from planting poor seeds by removing floaters before storage. For long-term storage, place a small silica gel packet in your paper envelope to absorb any residual moisture. This keeps seeds viable for the full 2-3 years mentioned in the instructions.
Pro Tips for Clover Seed Heads
- These simple tricks will help you avoid the tangled mess and get the cleanest, most viable seeds every time.
- Timing is Everything: In Step 1, when checking for maturity, look for pods that easily release seeds with a gentle tu...
- Drying Strategy: During Step 3, the 3-5 day drying time can feel like forever, but this is critical for seed viabilit...
Frequently asked questions
Got questions about clover seed heads?
You’re not alone! Whether you’re a beginner gardener or a seasoned seed saver, these FAQs will help you navigate the process like a pro.
When do clover seed heads form?
Clover seed heads typically appear in late summer to early fall (August–October, depending on your climate). Look for small, round, pea-like pods that start green and turn brown as they mature. Harvest them when they’re dry and crispy—usually 3–4 weeks after flowering. Pro tip: Morning harvests prevent seed loss from birds or wind!
How long does it take for clover seeds to mature?
From flower bloom to seed readiness, clover seeds usually take 4–6 weeks. Monitor the pods closely—they’ll start as soft and green, then harden and split open when fully ripe. If left too long, seeds may scatter or sprout prematurely. Quick check: Gently squeeze a pod; if it crumbles easily, it’s time to harvest!
Can I save seeds from any clover variety?
Most white Dutch, red, or alsike clover varieties produce viable seeds, but microclover (like Dutch) may yield fewer seeds. Avoid hybrid clovers (e.g., "Improved" mixes)—they often don’t reproduce true to type. Stick to heirloom or open-pollinated varieties for reliable seed saving. Bonus: Mixing varieties can boost biodiversity in your lawn!
Why are birds eating my clover seed heads?
Birds love clover seeds! To protect your harvest, cover seed heads with fine mesh netting or collect pods early in the morning. Alternatively, harvest when pods are half-ripe (still green but firm) and dry them indoors. Troubleshooting: Shake plants gently—if seeds rattle, they’re ready to go!
What’s the best way to store clover seeds?
Store seeds in a cool, dry place (like a sealed jar or envelope) in a dark cupboard. Label with the date—clover seeds stay viable for 2–3 years if kept dry. For long-term storage, add a desiccant packet to prevent moisture buildup. Keep it fresh: Avoid refrigeration unless humidity is high!
Wrapping up and next steps
Clover seed heads offer a hands-off, sustainable way to save seeds without the hassle of tangled pods. Whether you're a gardener, homesteader, or eco-conscious enthusiast, these twist-free wonders simplify seed collection and support biodiversity—all while keeping your lawn thriving! 🌱
Ready to put your newfound knowledge into action? Start by observing your clover patches this season, and soon you’ll be harvesting seeds like a pro. Happy gardening—and happy growing! 🌟