
Planting
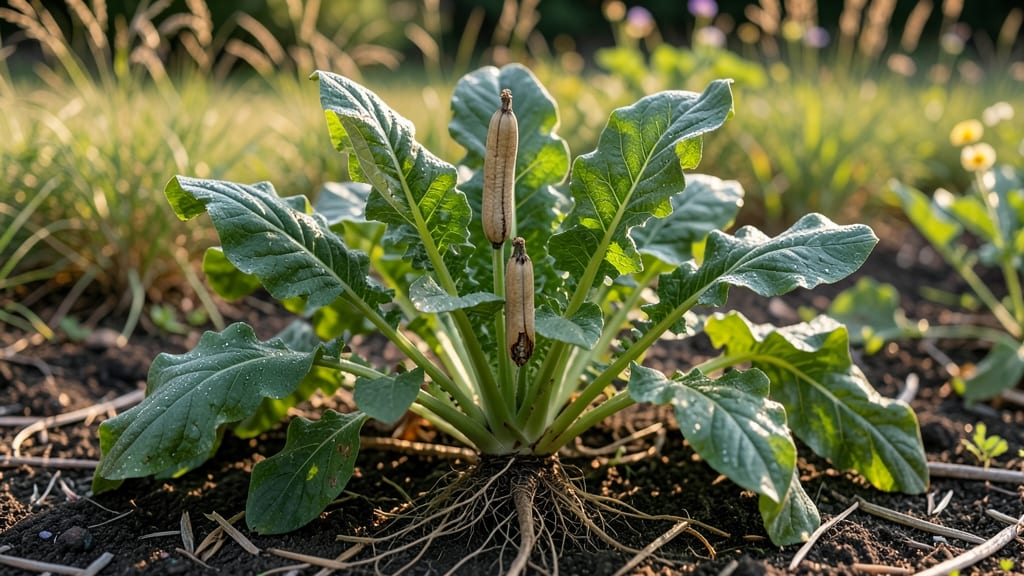
Growing radish plants to collect their seed pods is like nature’s own popcorn—except the kernels are tiny, the pods split open dramatically, and the payoff is a stash of seeds that’ll grow next year’s crop. 🌱 I’ve saved seeds from my own garden for three seasons now, and the process is simpler than you’d think: just let the plants bolt, watch the pods swell, and harvest at the right moment.
The best part? These seeds work for organic gardens and heirloom varieties, so you’re not just saving money—you’re preserving flavors and traits that disappear from store-bought seed racks.
The magic happens after radishes finish their edible life cycle. Once the green tops turn woody and the pods start forming, it’s time to step back and let nature do the work.
A single plant can produce hundreds of seeds, and with proper drying, they’ll stay viable for 3-5 years. The pods will pop open on their own when fully dry—no need to rush them.
Just bundle a few stems together, hang them upside down in a dry, shaded spot, and wait for the seeds to rain down into a bowl below.
You’ll end up with a collection of seeds that’ll grow into radishes just like their parents—same color, same shape, same crunch. The first time you watch those pods split open and seeds spill out, it’s like unlocking a gardening superpower.
No fancy equipment needed, just patience and a little space. The seeds are ready to plant as soon as they’re fully dried and stored in a cool, dark place.
Troubleshooting is easy once you know the signs: if pods split too early, it’s often from overripe plants or humidity. For poor seed production, check if your radishes bolted too late in the season or if they didn’t get enough sunlight.
But don’t stress—even a small harvest means you’re on the right track. These seeds are perfect for next year’s garden, whether you’re growing in containers or a full plot.
📚 In This Guide
- What you need
- Instructions
- Tips and common mistakes
- Wrapping up and next steps
What you need
- ● Radish seeds: Choose a variety known for natural pod popping, like Raphanus sativus (e.g., 'Cherry Belle' or 'French Breakfast'). Buy 1 packet (50–100 seeds) for a small harvest.
- ● Growing containers: 2–3 6-inch pots (for individual plants) or
- ● A 12-inch-wide shallow tray (for multiple plants, spaced 2–3 inches apart).
- ● Potting mix: 1 bag (1–2 cubic feet) of high-quality, well-draining seed-starting mix or garden soil amended with compost.
- ● Watering can or spray bottle: With a fine rose nozzle to avoid disturbing seeds.
- ○ Gloves (optional): Lightweight gardening gloves to protect hands from soil.
- ● Plant labels & marker: To track varieties (e.g., 3–5 labels if growing multiple types).
- ● Sunlight access: A south-facing window (6+ hours/day) or a grow light (12–14 hours/day).
- ● Patience: Radishes mature in 25–30 days—no rushing!
- ● Compost tea or fish emulsion: For a nutrient boost if soil is poor.
- ● Row covers or mesh: To deter pests like flea beetles.
- ● Camera or journal: To document the magical pod-popping process!
Step-by-step guide to harvesting radish seeds naturally
Skip the messy drying process and let radish plants do the work for you.
🌿 Step 1: Grow Radishes to Full Maturity
Start by planting radish seeds in well-draining soil with full sun exposure. Unlike the quick-harvest varieties we eat, let these grow until the pods fully mature—usually 60-70 days after planting. You'll know they're ready when the pods turn brown and dry out completely, almost like brittle paper.
Don’t harvest too early. If you pick pods when they’re still green, the seeds inside won’t be fully developed. The pods should rattle when shaken—this means the seeds are loose and ready to pop out naturally. Water consistently until the pods mature, but reduce watering as they dry to avoid mold.
⏰ Step 2: Wait for Natural Pod Popping
Once the pods are fully dry, leave them on the plant for 1-2 weeks. The pods will eventually split open on their own, releasing seeds into the soil below. This is the "hands-off" part of the process—no cutting, no drying racks, just patience.
Check daily for open pods. If rain is forecasted, collect the pods immediately to prevent seeds from getting soggy. You’ll see tiny black seeds scattered on the soil surface or caught in the plant’s stems. This is your signal that the seeds are ready for collection.
🪴 Step 3: Collect and Store Seeds
Gently shake the plant over a clean, dry container to catch any loose seeds. Use a small mesh bag or paper envelope to collect seeds from both the plant and the soil. Avoid using plastic bags—they trap moisture and can spoil the seeds.
Let the collected seeds air-dry for 3-5 days in a cool, dark place. Spread them out on a paper towel or mesh screen to prevent clumping. Once fully dry, store them in a sealed envelope or small jar in a cool, dry spot. Label with the variety and date—radish seeds stay viable for 2-3 years when stored properly.
🌱 Step 4: Clean and Prepare for Next Season
After collecting seeds, trim the plant back to the ground. Radish plants are biennials, meaning they’ll bolt and produce seeds in their second year. If you’re not saving seeds, you can compost the remaining plant material. For next season, simply replant your saved seeds in early spring or fall.
Here’s the thing—radish seeds are tiny, so don’t be surprised if you lose some during collection. To make it easier, I like to use a fine-mesh strainer to sift through the soil and stems, catching every last seed. This ensures you’ll have plenty for planting next year.
Tips & tricks for perfect radish seed pod harvesting
This hands-off method takes patience, but these little tricks will make your seed collection foolproof.
Timing is Everything: The 60-70 day growing period is non-negotiable for fully developed seeds. I've learned the hard way that rushing this step means tiny, undeveloped seeds that won't germinate properly. Mark your planting date and count backward—this ensures you're ready when those pods finally dry out. The pods should feel completely brittle and make a rattling sound when shaken gently.
Weather Watch: Rain is the biggest enemy during the 1-2 week pod popping phase. I always check the weather forecast before leaving pods on the plant. If rain is expected, collect the pods immediately and finish drying them indoors. The seeds need to stay dry during this critical stage—even slight moisture can cause mold that ruins your entire harvest. Keep a small mesh bag handy to collect pods quickly if needed.
Collection Strategy: Those tiny black seeds are easy to lose in the soil! I've found that using a fine-mesh strainer (the kind used for sifting flour) over a clean container catches seeds that would otherwise get lost. After shaking the plant, I run the soil and stems through the strainer to collect every last seed. This simple tool has saved me from wasting seeds during collection—it's worth the small investment if you're serious about seed saving.
Storage Secrets: The 3-5 day air-drying period is crucial for seed viability. I spread seeds on a paper towel in a single layer and place them in a cool, dark cupboard. The paper towel helps absorb any remaining moisture while allowing airflow. Once completely dry, I transfer seeds to a small envelope with the variety name and date written on it. This labeling system has saved me from mixing varieties—something that would be disastrous when planting next season.
Pro Tips for Radish Plant Seed Pods
- This hands-off method takes patience, but these little tricks will make your seed collection foolproof.
- Timing is Everything: The 60-70 day growing period is non-negotiable for fully developed seeds.
- Weather Watch: Rain is the biggest enemy during the 1-2 week pod popping phase.
Frequently asked questions
Got questions about harvesting radish seeds from those iconic pods? We’ve got answers! Whether you’re a first-time grower or looking to perfect your technique, these FAQs cover the basics—plus a few pro tips—to ensure your seed pods pop open naturally (or with a little help). Let’s dive in!
How do I know when radish seed pods are ready to harvest?
Radish seed pods are ready when they turn brown, dry out, and start splitting open on their own—usually 60–90 days after planting. If pods stay green or plump, they’re not mature yet. Wait until they’re crispy and hollow-sounding inside for best results. Pro tip: Harvest on a dry day to avoid mold!
What if my radish pods won’t pop open naturally?
Don’t worry—sometimes pods need a nudge! Once fully dry, gently crush the pods between your fingers or tap them on a hard surface to release seeds. If they’re still stubborn, let them dry completely (even indoors) for a few more days. Avoid cutting pods open too soon—they won’t release seeds properly!
Can I save seeds from store-bought radishes?
Nope! Store-bought radishes are often hybrids (crossbred for flavor/texture) and won’t produce true-to-type seeds. For seed saving, grow open-pollinated varieties like ‘French Breakfast’ or ‘Cherry Belle.’ Check seed packets for “suitable for seed saving” labels to avoid disappointment.
How long do radish seeds stay viable for planting?
Radish seeds stay viable for 2–4 years if stored properly in a cool, dry place (like a sealed jar in the fridge). For best germination, use seeds within 1 year. Test viability by planting a few seeds—if they sprout, the rest are good to go!
What can I do with leftover radish seed pods after harvesting?
Don’t toss them! Use leftover pods for:
- Compost: Chop them up and add to your compost pile.
- Crafts: Dry pods for wreaths or winter decorations.
- Animal feed: Crush into birdseed mixes (birds love the texture!).
Wrapping up and next steps
Growing radish seed pods is a rewarding, hands-off process that rewards patience with a burst of natural beauty—and now you’ve got all the tips to make it effortless!
Whether you’re harvesting for fresh seeds, preserving heirloom varieties, or simply enjoying the spectacle of pods popping open, this method keeps things simple and fun. 🌱✨
Ready to level up your gardening game? Start by saving a few pods from your favorite radish varieties this season—then experiment with drying techniques or share your newfound skills with fellow green thumbs. Happy growing! 🌟