
Propagation
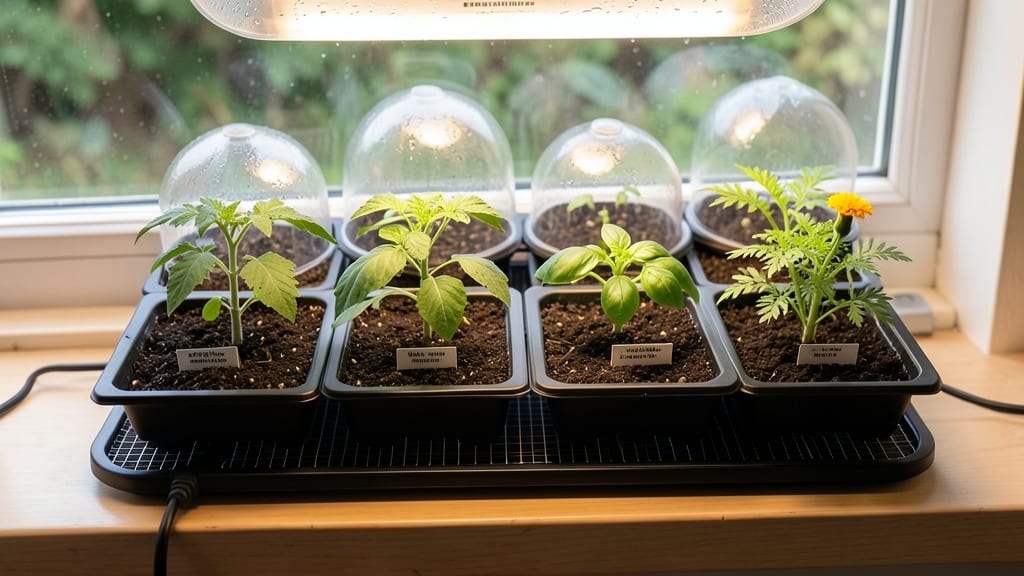
Warming mats cut seed-starting time in half—no more waiting weeks for stubborn sprouts. 🌱 I’ve used them for three seasons now, and the difference between a slow, hit-or-miss germination and a fast, reliable start is night and day.
The right mat keeps seeds cozy without overheating, so you skip the guesswork of heat lamps or bottom-heating trays.
You’ll need a mat sized for your seed trays (most work with standard 10x20-inch flats), a thermometer to monitor temps, and a power source nearby.
Place the mat under your seed tray, set it to the right temperature for your seeds—70-85°F for most veggies—and keep it plugged in until germination. No more cold spots or uneven heat that leaves some seeds behind.
By day 7, you’ll see sprouts popping up 2-3 days earlier than without heat, and delicate seeds like peppers or tomatoes won’t struggle to break through.
The mat stays cool to the touch, so it’s safe for seedlings once they emerge—just unplug it and let them grow under lights or natural light.
Pro tip: Pair your mat with a humidity dome for extra speed, and avoid overwatering—moisture plus heat equals mold. For seeds that need consistent warmth, like parsley or carrots, keep the mat running until they’ve sprouted twice. Now you’re ready to graduate those seedlings to their next phase!
📚 In This Guide
- What you need
- Instructions
- Tips and common mistakes
- Wrapping up and next steps
What you need
- ● Seed starting warming mat – Choose one with adjustable heat settings (typically 60°F–100°F) and a size that fits your seed trays or containers. A 10" x 20" mat is a great standard option.
- ● Seed trays or containers – Opt for trays with drainage holes (e.g., 1020-cell trays or 72-cell plug trays) to prevent waterlogging.
- ● Seed starting mix – A lightweight, sterile mix designed for germination (avoid garden soil—it’s too dense!). A 10-quart bag is ideal for most setups.
- ● Seeds – High-quality, fresh seeds (check the packet for specific germination requirements). Start with 50–100 seeds to test your setup.
- ● Spray bottle – For gentle watering without disturbing seeds or soil.
- ○ Clear plastic dome or humidity lid – Helps retain moisture (optional but highly recommended for the first few days).
- ○ Thermometer (optional but helpful) – A small digital probe thermometer to monitor soil temperature (aim for 70°F–85°F for most seeds).
- ● Scissors or utility knife – For cutting seed trays or warming mat covers (if needed).
- ● Plant labels & marker – To track seed varieties and planting dates.
- ● Grow lights or sunny windowsill – Seeds need 12–16 hours of light daily once they sprout (warming mats alone won’t provide light).
- ● Heat mat pad or insulating mat – Some mats require a non-conductive surface (check product guidelines).
- ○ Fan (small, optional) – A gentle breeze can prevent damping-off disease in humid conditions.
How to use seed starting warming mats for faster germination
Here's the simple system I rely on to get seeds sprouting in half the time—no guesswork, just consistent heat.
🌱 Step 1: Prepare Your Seed Trays and Soil
Start by filling your seed trays with moistened seed starting mix—just damp enough that it holds together when squeezed but doesn't drip. I press it down lightly with my fingers to create a firm, even surface. This prevents seeds from sinking too deep when you plant them later. The key here is consistency: every seed should have the same contact with the mat's heat.
Use the exact mix you'd normally use, but avoid compacting it too much. You want roots to push through easily, not fight against resistance. If you're using a humidity dome, place it upside down on the tray while you work—it'll keep everything protected while you arrange your seeds.
💧 Step 2: Arrange Seeds and Position the Warming Mat
Sow your seeds according to package instructions, then place the warming mat directly beneath the trays. I like to use a shallow tray or saucer under the mat to catch any condensation that forms during germination. The mat should cover the entire bottom surface of the tray—no gaps, no partial coverage. Uneven heat distribution is what causes slow or uneven sprouting.
Turn on the mat and set it to the recommended temperature for your seeds (usually 75-85°F). Most mats have adjustable settings, so don't just turn it to "high"—check your seed packet for the ideal range. You'll see condensation form on the dome or lid within minutes—that's normal and actually helps maintain humidity.
☀️ Step 3: Monitor Heat and Moisture Daily
Check the soil moisture every 2-3 days—you want it to stay consistently damp, not soggy. The warming mat will speed up evaporation, so you might need to water more frequently than usual. I use a spray bottle to mist the soil surface rather than pouring from above, which can dislodge seeds or disturb the soil structure.
Watch for condensation on the inside of your humidity dome. If it's heavy and doesn't dissipate within an hour, your environment is too humid. Remove the dome for 10-15 minutes to let excess moisture escape. You'll know the mat is working when seeds sprout within 5-10 days instead of the usual 2-3 weeks—sometimes even faster for heat-loving plants like peppers and tomatoes.
⏰ Step 4: Transition to Normal Growing Conditions
Once 50% of your seeds have sprouted, remove the warming mat immediately. The sudden drop in temperature helps strengthen seedlings by forcing them to adapt. I place them under grow lights (about 2-4 inches away) to prevent leggy growth. Without the mat's heat, seedlings grow more slowly but develop stronger stems and roots.
After 7-10 days of normal growth (when seedlings have their first true leaves), you can start a gradual light exposure routine. Move them to a sunny windowsill or under lights for 12-14 hours daily. This transition period is critical—rushing it can shock delicate seedlings, while taking too long can make them overly dependent on artificial warmth.
✂️ Step 5: Harden Off Before Transplanting
Two weeks before your last frost date, begin hardening off your seedlings by placing them outside in a sheltered spot for 1-2 hours the first day. Gradually increase their outdoor time by 1 hour daily, moving them to sunnier locations as they adapt. The warming mat won't be part of this process, but the strong start you gave them with even heat means they'll handle transplant shock better than seedlings grown without it.
By the time you're ready to plant, your seedlings will be sturdy, compact, and ready to thrive in the garden. The warming mat's work is done, but the foundation of fast, even germination means you'll have a head start on the season—and that's the whole point.
Tips & tricks for perfect seed starting with warming mats
Real talk: Warming mats are game-changers for seed germination—but only if you use them right. Here's what nobody tells you about maximizing those 75-85°F temperatures.
Heat Distribution is Everything: The mat should cover the entire bottom surface of your tray, not just part of it. I've seen beginners place the mat under only half the tray, which leads to uneven sprouting. If you have multiple trays, use separate mats or ensure each tray has full coverage. Even a 1-inch gap can create a cold spot where seeds fail to sprout. Think of it like a heating pad—full contact equals consistent warmth.
Condensation is Your Friend (But Not Too Much): That heavy fog inside your humidity dome? That's normal condensation from the warming mat doing its job. But if it doesn't dissipate within an hour, your setup is too humid. I've learned this the hard way—overly damp conditions can rot seeds before they sprout. The 10-15 minute dome removal trick is your secret weapon for balancing moisture without sacrificing warmth.
Timing the Transition Matters: When 50% of your seeds have sprouted, that's your cue to remove the warming mat immediately. I can't stress this enough: the temperature drop forces seedlings to adapt and develop stronger stems. If you leave the mat on too long, you'll get leggy, weak seedlings that flop over like overcooked noodles. The 7-10 days of normal growth afterward are where real strength builds—don't rush this step.
Soil Moisture is a Balancing Act: The warming mat speeds up evaporation, so you'll need to check soil moisture every 2-3 days instead of weekly. I use a spray bottle because it lets me target just the surface without disturbing seeds. Pro move: Press your finger into the soil—it should feel damp but not soggy. If it's dry at the surface but wet below, you're overwatering. The mat's heat means less water overall, not more.
Pro Tips for Seed Starting Warming Mats
- Real talk: Warming mats are game-changers for seed germination—but only if you use them right. Here's what nobody tel...
- Heat Distribution is Everything: The mat should cover the entire bottom surface of your tray, not just part of it. I'...
- Condensation is Your Friend (But Not Too Much): That heavy fog inside your humidity dome? That's normal condensation ...
Frequently asked questions
Got questions about seed starting warming mats? You're not alone! Here are some of the most common concerns—and their answers—to help you get the most out of your setup.
How long should I keep my seeds on a warming mat?
A warming mat typically speeds up germination by 2–3 days compared to room temperature. Most seeds benefit from 7–14 days of consistent warmth (usually 65–85°F, depending on the seed type). Once sprouts appear, remove the mat to prevent overheating or leggy seedlings.
Can I use a warming mat for all types of seeds?
Warming mats work best for slow-germinating seeds like tomatoes, peppers, or herbs. For fast germinators (e.g., radishes, lettuce), they’re unnecessary—just keep them in a warm spot. Always check seed packets for specific recommendations!
What if my warming mat isn’t heating up?
First, check the power source (outlet or USB port) and ensure the mat is properly plugged in. If it’s still cold, try resetting it by unplugging for 10 minutes. If the issue persists, test another outlet or consider a replacement—safety first!
Do I need a warming mat if I have a heat mat?
Seed starting mats
are generally safer and more energy-efficient than traditional heat mats. They provide gentle, even warmth without risking overheating. Plus, they’re often reusable and easier to clean—win-win!
Can I make a DIY warming mat?
A simple DIY option is a heating pad wrapped in a towel (low setting) or a repurposed laptop cooling pad. Just monitor temps closely—DIY mats can overheat faster. For consistency, though, store-bought mats are the way to go!
Wrapping up and next steps
Starting seeds with a warming mat isn’t just a trick—it’s a game-changer for gardeners eager to see their green thumbs in action! 🌱 With consistent warmth and faster germination, you’ll be well on your way to a thriving garden in no time.
Whether you’re a seasoned pro or a beginner, this simple tool can make all the difference.
Ready to level up your seed-starting game? Grab a warming mat, follow the steps, and watch your seeds sprout with confidence. Next up: Transplant those little seedlings into soil and keep nurturing them—your future harvest is just around the corner! 🌿