
Lawn
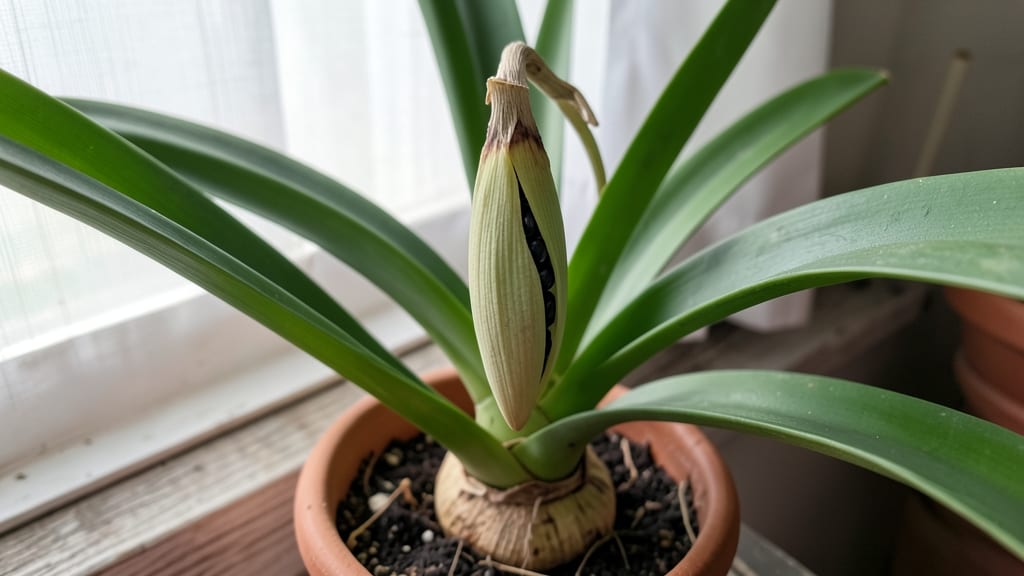
Collecting amaryllis seed pods doesn’t require patience—just a little trick. 🌱 The secret to effortless seed collection lies in letting nature do the work, then stepping in at the perfect moment to preserve those tiny treasures before they scatter.
Start by identifying mature pods—they’ll turn from green to a papery brown and feel slightly soft when gently squeezed. Once they’re ready, place them in a brown paper bag (no plastic!) and tie it loosely. Within days, you’ll hear the seeds rattling inside, signaling they’re ready for processing.
What you’ll end up with is a batch of plump, dark seeds that germinate faster than store-bought bulbs. The key is speed: plant them within a week of collection, and you’ll see sprouts in just 4-6 weeks with proper warmth and humidity.
Works for both indoor growers and outdoor gardeners—just adjust timing for your climate. Here’s how to make it foolproof every time.
📚 In This Guide
- What you need
- Instructions
- Tips and common mistakes
- Wrapping up and next steps
What you need
- ● Amaryllis plant (Hippeastrum spp.) – Ensure it has bloomed and produced seed pods (preferably after fertilization).
- ● Pruning shears or sharp scissors – For cleanly harvesting mature seed pods.
- ● Paper bags or breathable mesh bags – 2-3 medium-sized bags (8"–10" in diameter) to collect pods and prevent moisture buildup.
- ● Labeling tags or markers – To mark pods by variety and harvest date (e.g., "Hippeastrum 'Red Lion' – June 2024").
- ○ Glove (optional but recommended) – Protects hands from thorns or rough pod surfaces.
- ● Damp paper towels or seed-starting mix – For storing pods if they’re not fully dry yet.
- ● Small fan or well-ventilated area – Helps dry pods faster without mold risk.
- ● Humidity dome or plastic wrap – Speeds up germination if you’re saving seeds for planting.
- ● Digital scale (0.1g precision) – For weighing seeds if tracking viability or quantity.
- ● Seed tray with drainage holes – If you plan to germinate seeds immediately.
- ● Camera or phone – Capture pod development stages for future reference!
Step-by-Step guide for collecting amaryllis seeds naturally
Here’s the simple method I use every year to harvest amaryllis seeds without stress or mess.
🌱 Step 1: Identify and Support the Flowering Stem
Let your amaryllis bulb flower indoors first—this ensures the seed pod will develop properly. Once the flower blooms and begins to fade, leave the spent blossom attached to the stem. The pod will form at the base of the flower, swelling over 4-6 weeks as it matures. Keep the plant in bright, indirect light and water when the top inch of soil feels dry—never let it sit in soggy soil.
Here’s the thing—amaryllis seed pods are delicate. If you prune the stem too early, the pod won’t form. Wait until the flower wilts completely before touching it. You’ll know it’s ready when the pod turns a light green color and feels slightly firm to the touch.
🌿 Step 2: Create a Natural Release Environment
Move the potted amaryllis outdoors to a shaded, sheltered spot once the pod turns brown and papery. This mimics the plant’s natural seed-dispersal process. Place the pot on a tray lined with newspaper or a mesh bag—this catches seeds without crushing them. The pod will eventually split open on its own, releasing seeds over 1-2 weeks.
Don’t rush this step. If you cut the pod open too soon, the seeds won’t be fully mature. You’ll see tiny black seeds inside when they’re ready. I like to leave the pod on the plant until it’s completely dry and brittle—that’s your signal it’s time to collect.
🪴 Step 3: Collect and Store Seeds Properly
Once the pod is empty or nearly empty, gently remove it from the stem and place it in a paper bag. Store the bag in a cool, dry place (like a pantry) for 4-6 weeks to dry the seeds further. This stratification period mimics winter conditions and helps break seed dormancy. After drying, shake the bag gently to separate seeds from chaff.
Sow the seeds immediately or store them in an airtight container with a moist paper towel to keep them from drying out. Label the container with the date—amaryllis seeds stay viable for up to a year if stored properly. I’ve had luck sowing them in late winter for spring germination.
⏰ Step 4: Plant the Seeds for Germination
Fill small pots with well-draining potting mix and sow the seeds ½ inch deep, spacing them 1 inch apart. Keep the soil moist but not soggy—amaryllis seeds need consistent moisture to germinate. Place the pots in a warm spot (70-75°F) with bright, indirect light. Germination can take 4-8 weeks, so be patient.
Here’s where it gets fun—watch for the first tiny green shoots to appear. Once they reach 2 inches tall, transplant them into individual pots. It takes 3-5 years for seed-grown amaryllis to bloom, but the wait is worth it for the unique varieties you’ll grow.
Tips & tricks for perfect amaryllis seed pod collection
Patience and timing make all the difference when collecting amaryllis seeds naturally. Here’s how to avoid common pitfalls and get the best results.
Timing is Everything: In Step 1, those 4-6 weeks for pod development can feel like forever, but rushing it will ruin your harvest. The pod needs this time to mature properly—don’t trim the flower until it’s completely wilted and turns light green. I’ve learned the hard way that cutting too soon means no seeds, so mark your calendar when the bloom opens to track progress.
Environment Matters: For Step 2, the transition to outdoors is crucial. Choose a spot with morning sun and afternoon shade to prevent the pod from drying out too quickly. I use a mesh bag under the pot to catch seeds without crushing them, and it’s saved me from losing seeds to wind or pests. The 1-2 weeks of natural release time is non-negotiable—this is when the seeds reach full maturity.
Storage Wisdom: After collecting, the 4-6 weeks of stratification in Step 3 mimics winter conditions perfectly. Place your paper bag in a cool pantry corner where humidity stays low. I’ve found that shaking the bag gently after this period separates seeds from chaff without damaging them. For long-term storage, keep seeds in an airtight container with a moist paper towel—they’ll stay viable for up to a year.
Germination Secrets: In Step 4, maintaining 70-75°F warmth is key for germination. I use a seedling heat mat under my pots to ensure consistent warmth, especially in cooler climates. The ½ inch deep planting depth might seem shallow, but it’s perfect for amaryllis seeds—any deeper and they won’t have enough light to sprout. Watch for those tiny green shoots after 4-8 weeks, and resist the urge to check too often!
Pro Tips for Amaryllis Seed Pod
- Patience and timing make all the difference when collecting amaryllis seeds naturally.
- Timing is Everything: In Step 1, those 4-6 weeks for pod development can feel like forever, but rushing it will ruin your harvest.
- Environment Matters: For Step 2, the transition to outdoors is crucial.
Frequently asked questions
Got questions about amaryllis seed pods? You’re not alone! Here are answers to the most common queries—from timing to troubleshooting—to help you master seed collection like a pro.
How do I know when amaryllis seed pods are ready to harvest?
Amaryllis seed pods are ripe when they turn papery-brown and split open on their own. If you see the pods cracking or seeds spilling out, it’s time to collect them! Avoid harvesting too early—the seeds won’t germinate properly.
Why aren’t my amaryllis pods producing seeds?
Seed pods may fail to form if your plant wasn’t pollinated. Try gently transferring pollen from one flower to another with a small brush (like a makeup sponge). Low light or stress can also stunt pod development—ensure your amaryllis gets 6+ hours of sunlight and well-draining soil.
Can I grow amaryllis from seed pods instead of bulbs?
Plant the flat, black seeds in a mix of peat moss and perlite, keeping them warm (70–75°F) and moist. Germination takes 4–8 weeks. Just know: seed-grown amaryllis may take 3–5 years to bloom—patience is key!
What do I do if my seed pods mold or rot?
Mold or rot usually means overwatering or poor airflow. Remove affected pods immediately, then reduce watering and improve ventilation. Spray the area with a fungicide (like neem oil) to prevent spread. Let the soil dry between waterings!
Do amaryllis seed pods need special storage?
Store harvested seeds in a cool, dry place (like a paper envelope) until planting. They stay viable for 1–2 years if kept dry. Avoid plastic bags—humidity causes mold. Label them with the harvest date for tracking!
Wrapping up and next steps
Growing amaryllis seed pods is a rewarding way to propagate these stunning blooms naturally—without the fuss! By mastering the natural release trick, you’ll unlock a hands-off method to collect seeds effortlessly while nurturing new plants.
Whether you’re a seasoned gardener or just starting out, this technique proves that patience and a little know-how can turn your amaryllis into a thriving seed source.
Ready to take the next step? Try this method with your own amaryllis this season—and don’t forget to share your seed-collection success with fellow plant lovers! 🌱✨