
Lawn
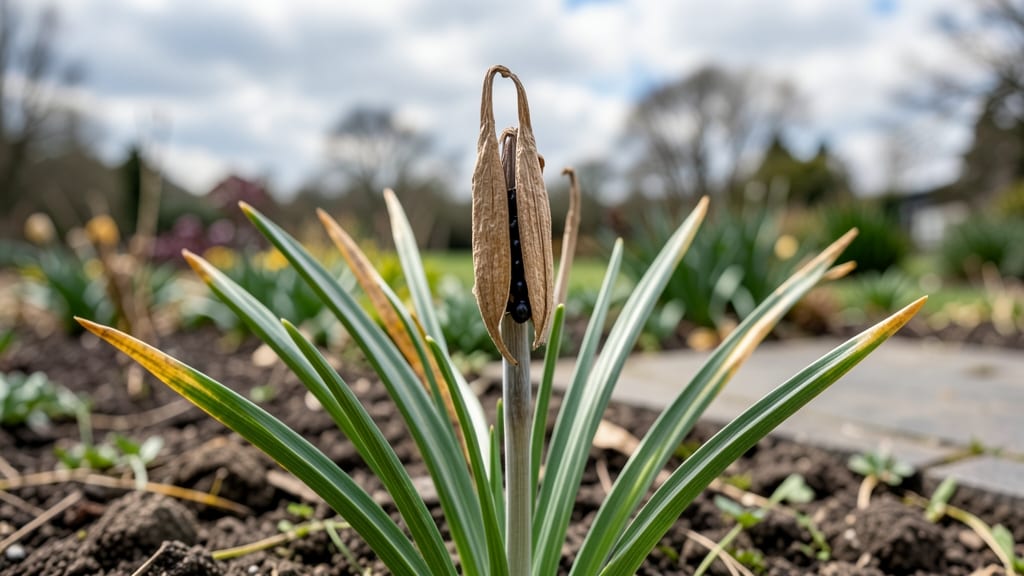
Harvesting crocus seed pods means unlocking a rare way to grow these early spring bloomers from scratch—no bulbs needed. 🌱 While most gardeners rely on bulbs, seed-grown crocuses develop unique color variations and naturalize over time, though the process demands patience and the right timing.
The key is collecting seed pods after they turn brown and papery in late spring, then carefully extracting the seeds without twisting the pods. Unlike bulb propagation, seeds take 2-3 years to bloom, but the reward is watching your own crocuses return year after year in the same spot.
This method works best in zones 3-8, where winters are cold enough to trigger dormancy.
You’ll need a flat tray for sowing, well-draining soil, and a sunny spot with partial shade—too much sun can dry out the delicate seedlings. Germination is slow but steady, with tiny leaves appearing in 6-8 weeks.
The first year focuses on root growth, so resist the urge to transplant until you see strong foliage.
Common pitfalls include overwatering (which causes rot) and impatience with the long wait for blooms. If germination stalls, try stratifying seeds in the fridge for 4-6 weeks before sowing. Once established, these seed-grown crocuses will spread like wildflowers, creating a naturalized carpet of color that bulbs can’t match.
📚 In This Guide
- What you need
- Instructions
- Tips and common mistakes
- Wrapping up and next steps
What you need
- ● Mature crocus seed pods: Wait until the pods turn brown and dry (typically late spring to early summer). Aim for at least 10-15 healthy pods for a good seed yield.
- ● Pruning shears or sharp scissors: A pair with clean, sterilized blades to avoid damaging the pods or spreading disease.
- ● Paper bags or breathable mesh sacks: 2-3 medium-sized bags (8x10 inches) to store pods while they dry further.
- ● Tweezers or small forceps: For gently extracting seeds from pods without crushing them.
- ● Labeling tags and a marker: To mark pods by variety or harvest date (e.g., "Crocus vernus – May 2024").
- ● Gloves: Lightweight gardening gloves to protect hands from prickly stems.
- ● Magnifying glass: For inspecting seed viability if you’re saving seeds for propagation.
- ● Seed envelope or airtight container: For long-term storage once seeds are fully dried.
- ● Spray bottle with water: To lightly mist pods if they’re too dry or brittle during handling.
Step-by-Step guide to harvesting crocus seeds without twisting the pods
Here’s how to collect viable crocus seeds naturally—no forcing or twisting required.
🌱 Step 1: Identify and Wait for Mature Seed Pods
Crocus seed pods mature after the flowers bloom and wither. Look for pods that turn from green to a light brown color—this signals they’re ready for harvesting. I wait until they’re fully dry and slightly papery to the touch, which usually takes 4-6 weeks after flowering. If you pick them too early, the seeds won’t be fully developed.
Gently squeeze a pod between your fingers. If it feels hollow and crinkly, it’s ready. If it’s still firm, leave it on the plant for another week. Overripe pods may split open naturally, so check them weekly once they turn brown. Harvesting too late risks losing seeds to birds or wind.
🌿 Step 2: Harvest Pods Without Damaging the Plant
Use clean, sharp scissors or pruning shears to snip the seed pods from the stem, leaving about ½ inch of stem attached. This prevents the plant from wasting energy trying to heal a torn stem. Hold the pod gently—crocus stems are delicate, and rough handling can cause the pod to crack prematurely.
Place the harvested pods in a paper bag (not plastic) to allow airflow. Avoid storing them in a sealed container, as trapped moisture encourages mold. I label each bag with the variety and harvest date, which helps track seed viability later. If pods are still slightly green, lay them on a mesh screen in a dry, shaded spot for 2-3 days to finish drying.
💧 Step 3: Extract Seeds Without Twisting the Pods
Once the pods are completely dry, place them on a clean cutting board or paper towel. Instead of twisting (which often crushes seeds), gently roll the pod between your palms or tap it lightly with a spoon. The seeds will fall out naturally when the pod is fully desiccated. This method preserves seed integrity and prevents damage.
If some seeds stick inside, soak the pod in lukewarm water for 10-15 minutes—this softens the pod walls enough to release them without force. Spread the seeds on a dry surface to air-dry for 1-2 hours before storing. Never let them sit in water, as excess moisture reduces germination rates.
☀️ Step 4: Store Seeds for Optimal Germination
Transfer dried seeds into a paper envelope or small glass jar with a tight lid. Store them in a cool, dark place (like a refrigerator) at 35-45°F to maintain viability. Crocus seeds can remain dormant for years, but fresh seeds germinate best when planted within 6 months. Label the container with the harvest date—older seeds may take longer to sprout.
Before planting, test a few seeds by pressing them between your fingers. They should feel firm but not hard. If they crumble, they’ve lost viability. For best results, sow seeds in fall to mimic their natural germination cycle. Scatter them lightly on well-draining soil and cover with ¼ inch of compost—no need to bury them deeply.
⏰ Step 5: Plant and Monitor for Sprouts
Sow seeds in a sunny spot with at least 6 hours of sunlight daily. Crocus seeds need consistent moisture but dread soggy soil, so water gently after planting and keep the soil lightly moist until sprouts appear. Germination can take 4-8 weeks, depending on temperature and seed freshness.
Once seedlings emerge, thin them to 3-4 inches apart to give roots room to grow. Young crocus plants are slow starters, so be patient. The first true leaves will appear small and grass-like—don’t confuse them with weeds. Mulch lightly with ¼ inch of compost to retain moisture and deter pests.
Tips & tricks for perfect crocus seed pod harvesting
Between us, these little details make all the difference when collecting viable crocus seeds. Trust me on this—skipping them means risking crushed seeds or poor germination.
Timing Secret: The 4-6 week window after flowering is non-negotiable for seed maturity. I learned this the hard way after collecting premature pods that yielded only shrunken, non-viable seeds. Mark your calendar when flowers bloom to track this crucial timeline accurately. For late-season bloomers, consider setting a reminder to check weekly once pods turn brown.
Pod Handling Technique: In Step 2, when harvesting, always leave that ½-inch stem attached—it’s not just about aesthetics. The stem acts as a natural shock absorber when transferring pods to bags, preventing the delicate pods from cracking under their own weight. I’ve seen pods split open mid-transfer when this step was skipped, ruining days of growth.
Seed Extraction Strategy: That 10-15 minute lukewarm soak in Step 3 is your safety net for stubborn seeds. The key is using water that’s just warm enough to touch—hot water can cook the seeds while cold water won’t soften the pod walls effectively. I keep a small thermometer in my gardening kit to verify temperatures, especially when working with multiple batches.
Storage Wisdom: The 35-45°F range for seed storage isn’t arbitrary—it mimics the natural winter dormancy period crocus seeds experience. I store my seeds in the crisper drawer of my refrigerator where temperatures hover around 40°F. This cold storage extends viability beyond the 6-month window, though I always plant fresh seeds first for best results.
Pro Tips for Crocus Seed Pods
- Between us, these little details make all the difference when collecting viable crocus seeds. Trust me on this—skippi...
- Timing Secret: The 4-6 week window after flowering is non-negotiable for seed maturity. I learned this the hard way a...
- Pod Handling Technique: In Step 2, when harvesting, always leave that ½-inch stem attached—it’s not just about aesthe...
Frequently asked questions
Got questions about harvesting and working with crocus seed pods? You’re not alone! Here are answers to the most common queries—from timing to troubleshooting—to help you get the best results.
When is the best time to harvest crocus seed pods?
Harvest seed pods when they turn brown and papery (usually 6–8 weeks after flowering). Wait until they’re fully dry but still intact—if they split open, seeds may scatter. Early morning harvests work best when pods are crisp and easy to twist off.
How do I twist off the seed pods without damaging them?
Gently grasp the base of the pod and twist firmly but slowly—they should snap off cleanly. Avoid yanking, which can tear the stem or pod. If pods resist, let them dry a bit longer. A small pair of pruners can help if needed, but twist first!
What if my crocus seed pods won’t twist off?
Overly green or wet pods won’t twist easily. Let them dry in a shady, well-ventilated spot (like a mesh bag) for 1–2 days. If pods still resist, they may need more time on the plant. Pro tip: Harvest on a sunny day when humidity is low for easier removal.
How should I store crocus seeds until planting?
Store seeds in a cool, dry place (like a paper envelope or jar) for up to 2 years. Avoid plastic bags—moisture causes mold. Label seeds with the harvest date and variety. For best germination, plant them as soon as possible after drying.
Can I use crocus seed pods from store-bought flowers?
No—store-bought crocus flowers are often hybrids or treated to prevent seeding. For viable seeds, use pods from open-pollinated varieties grown in your garden. Save seeds from heirloom or wild crocuses for the best results!
Bonus Tip:
If you’re new to seed saving, start with 10–15 pods to test germination rates. Not all seeds will sprout, so plan for a small batch. Happy harvesting!
Wrapping up and next steps
Harvesting crocus seed pods is a simple yet rewarding way to ensure viable seeds for future blooms—no twists or fuss required! By following the right steps, you’ll avoid damaging delicate flowers and maximize your chances of successful germination.
Whether you’re a seasoned gardener or just starting out, this natural method is both easy and eco-friendly.
Ready to put your new skills to the test? Grab your gloves and head outside—your garden (and next year’s crocuses!) will thank you. 🌱✨