Propagation
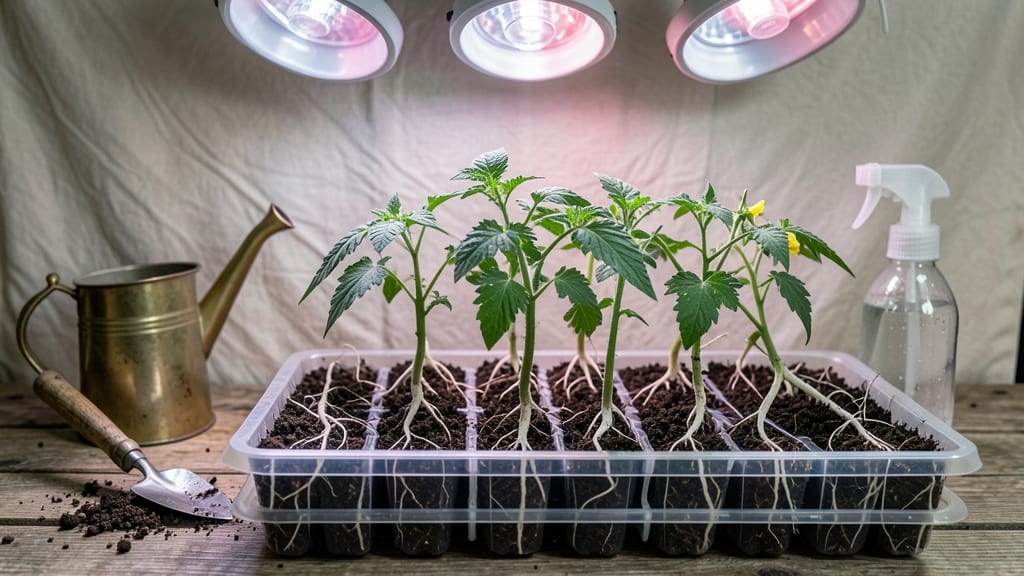
Starting seeds in deep root trays is the secret weapon for seedlings that don’t flop over when you transplant them. 🌱 I’ve tried shallow trays, peat pots, and even egg cartons, but nothing gives me plants with strong, deep roots like these trays do.
The difference shows up the moment you set them in the ground—they just keep growing instead of wilting or struggling.
These trays aren’t just deeper; they’re designed to encourage roots to grow downward, not just circle around in a tiny space. That means your seedlings develop stronger stems and better access to water, so they’re ready for the garden long before traditional methods.
Plus, you avoid the heartbreak of leggy, weak plants that can’t support themselves. The payoff? Healthier transplants that hit the ground running.
You’ll need a few simple supplies: the trays themselves, a good seed-starting mix, and a way to keep them warm (like a heat mat). Fill the trays with moist mix, plant your seeds at the right depth, and keep them consistently damp.
In just a few weeks, you’ll see roots growing down through the entire tray—proof that your seedlings are built to last.
Unlike shallow trays or peat pots, deep root trays give you flexibility for transplanting. You can pop out individual cells or move the whole tray into the ground, and the roots won’t break apart like they do with other methods.
It’s a game-changer for tomatoes, peppers, and other heavy feeders that need strong starts to thrive all season.
📚 In This Guide
- What you need
- Instructions
- Tips and common mistakes
- Wrapping up and next steps
What you need
- ● Deep Root Seed Starting Trays – Choose trays with at least 6-8 inches of depth (e.g., 72-cell trays with deep cells or modular inserts). Quantity: 1-2 trays (depending on your planting scale).
- ● High-Quality Seed Starting Mix – A lightweight, well-draining mix (e.g., 50% peat/coir + 50% perlite/vermiculite). Quantity: Enough to fill trays (typically 1-2 cubic feet per tray).
- ● Seeds – Select large, sturdy seeds (e.g., tomatoes, peppers, or herbs) that benefit from deep root growth. Quantity: 1-2 seeds per cell (or as recommended on the seed packet).
- ● Watering Can or Spray Bottle – With a gentle spray nozzle to avoid displacing soil.
- ○ Heat Mat (Optional but Recommended) – For faster germination (set to 70-80°F).
- ● Grow Lights or Sunny Windowsill – 12-16 hours of light daily once seedlings sprout.
- ● Small Hand Trowel or Spoon – For planting seeds at the correct depth.
- ● Bottom Tray or Drip Tray – To catch excess water and prevent messes.
- ● Humidity Dome or Plastic Wrap – Keeps moisture in during germination (remove after sprouting).
- ● pH Testing Kit – Ensures your soil mix is ideal (6.0-7.0 pH) for seedling growth.
- ● Fertilizer (Low-Dose) – A balanced, water-soluble fertilizer (e.g., 5-5-5) for later stages.
- ● Labeling Tags & Marker – To track seed varieties and planting dates!
How to use deep root seed starting trays for healthier seedlings
Here's the straightforward method I use to grow seedlings with strong roots and resilience.
🌱 Step 1: Prepare the Trays and Soil Mix
Fill your deep root trays with a lightweight, airy seed-starting mix—never garden soil. I like to blend the mix with 20% perlite or vermiculite to improve drainage and aeration. Tap the tray gently to settle the soil without compacting it. The goal is a fluffy texture that lets roots spread easily.
Moisten the mix until it's damp but not soggy—think of a wrung-out sponge. You'll know it's right when a handful holds together but doesn't drip water. Avoid overwatering now; soggy soil smothers seeds and invites rot. I like to let the mix sit for 10 minutes before sowing to ensure even moisture.
🌱 Step 2: Sow Seeds at the Correct Depth
Plant seeds twice as deep as their diameter—this prevents them from drying out while still allowing enough light to reach. For tiny seeds like lettuce, a light press with your finger is enough; larger seeds like beans need a slightly deeper press. I use a toothpick to create small holes if the mix is too loose.
Space seeds according to their mature size—crowding leads to weak, leggy seedlings. For example, tomatoes need 1-2 inches between seeds, while carrots should have 3-4 inches. After planting, cover seeds lightly with more mix and mist gently with water. A spray bottle keeps seeds from shifting deeper than intended.
💧 Step 3: Maintain Consistent Moisture and Warmth
Place the trays in a warm spot—70-75°F is ideal for most seeds. I use a seedling heat mat under the trays to speed up germination. Keep the soil consistently moist but never waterlogged; the top inch should feel damp to the touch. Overwatering now drowns seeds before they sprout.
Once seeds germinate, reduce bottom heat to 65-70°F to prevent overgrowth. You'll see tiny sprouts in 5-14 days, depending on the plant. At this stage, I switch to a watering can with a fine rose to avoid disturbing the soil surface. Keep trays in bright, indirect light until seedlings develop their first true leaves.
☀️ Step 4: Provide Light and Gradually Harden Off
Move seedlings under grow lights or a south-facing window as soon as they sprout. Leggy seedlings mean your light source is too far away—keep it within 2-4 inches of the plants. Rotate trays daily so seedlings grow straight, not lopsided. You’ll notice stronger stems and darker green leaves within a week.
When seedlings have 2-3 sets of true leaves, start hardening them off. Place trays outside in a sheltered spot for 1-2 hours the first day, then gradually increase exposure over 7-10 days. Watch for wilting—if it happens, they’re not ready. Hardened-off seedlings handle transplanting like pros.
Tips & tricks for maximizing root growth in seed starting trays
Here's what I've learned after years of growing seedlings—these small tweaks make all the difference in root development and plant resilience.
Soil Mix Secret: For even better drainage in Step 1, I add an extra 5% coconut coir to my seed-starting mix along with the 20% perlite or vermiculite. This creates tiny air pockets that encourage deeper root growth while preventing compaction. After moistening, let the mix sit for the full 10 minutes to ensure moisture penetrates evenly—this prevents dry pockets where roots might struggle.
Depth and Spacing: In Step 2, pay special attention to spacing when planting larger seeds like beans or peas. The 3-4 inch spacing mentioned works great, but I like to use a small ruler to mark planting lines in the tray. This prevents overcrowding and gives roots room to spread laterally, which creates stronger anchor systems. For tiny seeds, a toothpick makes perfect planting holes without disturbing the soil structure.
Temperature Troubleshooting: Maintaining the 70-75°F range in Step 3 can be tricky if your home runs cooler. I place my trays on top of a refrigerator (not inside) for gentle warmth without overheating. Once sprouts appear, reducing to 65-70°F prevents leggy growth—just move trays to a slightly cooler spot if needed. A digital thermometer helps monitor these subtle temperature shifts.
Lighting Hack: When moving seedlings to grow lights in Step 4, I start with 12 hours of light per day rather than continuous exposure. This mimics natural daylight cycles and prevents shock. The 2-4 inch distance guideline is perfect, but I use a small clip-on measuring tape to check regularly—seedlings grow surprisingly fast!
Pro Tips for Deep Root Seed Starting Trays
- Here's what I've learned after years of growing seedlings—these small tweaks make all the difference in root development and plant resilience.
- Soil Mix Secret: For even better drainage in Step 1, I add an extra 5% coconut coir to my seed-starting mix along with the 20% perlite or vermiculite.
- Depth and Spacing: In Step 2, pay special attention to spacing when planting larger seeds like beans or peas.
Frequently asked questions
Got questions about deep root seed starting trays?
You’re not alone! Here are answers to the most common ones to help you grow like a pro.
What’s the best time to start seeds in deep root trays?
Timing depends on your plants and climate. For most veggies like tomatoes or peppers, start 6-8 weeks before the last frost. Check seed packets for specific guidelines—deep root trays give you flexibility, but avoid overcrowding roots by transplanting too late.
Can I reuse deep root seed starting trays?
Yes! Clean them thoroughly with soapy water and a 10% bleach solution (1 part bleach to 9 parts water) to kill pathogens. Rinse well and let dry completely. Reusing saves money and reduces waste—just avoid using them for different plant families (like tomatoes and nightshades) consecutively to prevent disease.
What’s the difference between deep root trays and regular seed trays?
Deep root trays (typically 6+ inches deep) encourage stronger root systems, reducing transplant shock. Regular trays (2-3 inches) are shallower and better for fast germinators like lettuce. Deep trays are ideal for root crops (carrots, beets) or plants like tomatoes that need robust growth before outdoor planting.
How do I prevent damping-off in deep root trays?
Damping-off (a fungal disease) thrives in moist conditions. To avoid it:
- Use sterile seed-starting mix (avoid garden soil).
- Water from the bottom (tray method) to keep tops dry.
- Space seedlings for airflow and thin crowded trays.
- Add a fungicide (like neem oil) if needed.
Are deep root trays worth it for small spaces or beginners?
They’re perfect for small spaces because they maximize root growth in less area. Beginners benefit from reduced transplant shock and stronger seedlings. Start with easy plants like basil or herbs to test them out—just ensure you have a sunny spot (or grow lights) and consistent care.
How do I transition seedlings from trays to the garden?
Hardening off (acclimating seedlings to outdoor conditions) takes 7-10 days. Start by moving trays outside for a few hours daily, gradually increasing time. Water deeply before transplanting and plant at the same depth as they grew in trays. A cloudy day is ideal for minimal stress!
Wrapping up and next steps
Ready to give your seedlings the strongest start possible?
Deep root seed starting trays are your secret weapon for hardier, faster-growing plants—perfect for gardeners who want to skip the weakling stage and dive straight into thriving greenery! 🌱✨ Whether you're a beginner or a seasoned pro, these trays make propagation easier, more efficient, and way more rewarding.
Your next step? Grab your materials, follow the tips you’ve learned, and watch those roots flourish. Happy planting—your future garden will thank you! 🌿💚