
Lawn
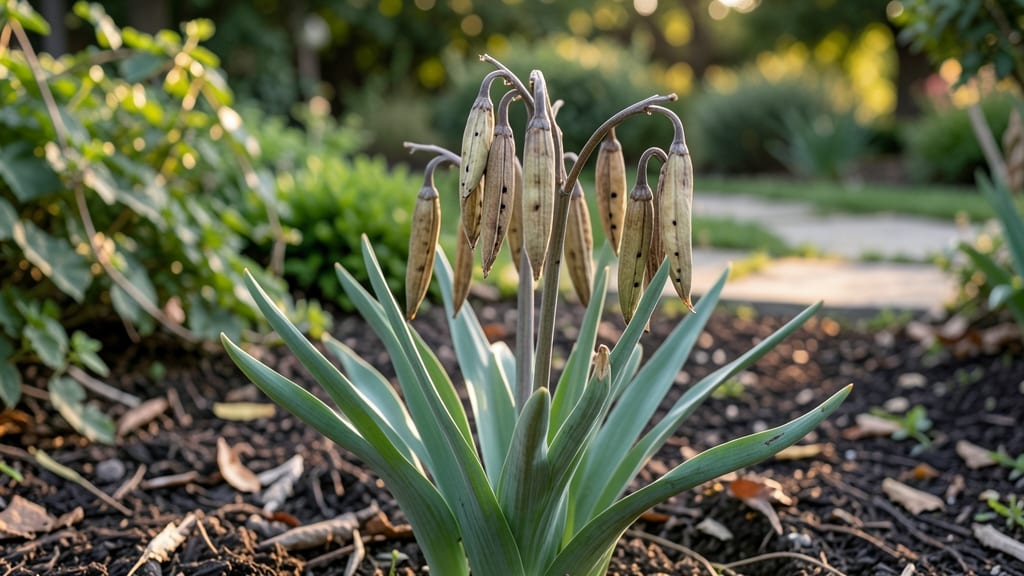
Hyacinth seed pods reveal a surprising secret: you can grow new plants from seed instead of just buying bulbs. 🌱 I’ve collected these woody capsules for years, and the process is simpler than most gardeners realize—no digging required.
The key is patience, since seed-grown hyacinths take 3-5 years to bloom compared to bulb-grown ones that flower in just a season.
First, spot the mature pods—those dry, papery husks that split open when ready. A gentle shake releases tiny black seeds, which you’ll plant ½ inch deep in well-draining soil. The real challenge isn’t collecting them; it’s waiting through the slow germination phase (often 6-12 months) before seedlings appear.
Most gardeners quit here, but those who stick it out get hardier plants adapted to their local climate.
Once sprouted, treat them like any bulb: bright light, moderate water, and no overcrowding. By year three, you’ll see green shoots—proof the wait was worth it.
These homegrown hyacinths may not bloom as dramatically as their bulb-grown cousins, but they’ll thrive with far less fuss and cost almost nothing to start.
For best results, collect pods in late summer when they’ve fully dried but haven’t yet split open. Store seeds in a cool, dry place until planting. The biggest mistake? Expecting instant blooms—this method rewards long-term gardeners who love watching tiny seeds become showstopping plants over time.
📚 In This Guide
- What you need
- Instructions
- Tips and common mistakes
- Wrapping up and next steps
What you need
- ● Mature hyacinth bulbs (ensure they’ve bloomed and developed seed pods—typically 6–12 months old).
- ● Seed pods (harvested when they turn brown and papery, usually late summer/early fall).
- ● Mesh bags or breathable fabric sacks (5–10 gallon capacity, with ¼–½ inch holes for airflow). Pro tip: Old onion sacks or garden mesh work perfectly! 💡
- ● Scissors or pruners (sharp, clean tools for snipping pods without damaging stems).
- ● Twine or rubber bands (to secure bags to stems or branches).
- ● Sturdy branches, trellises, or garden stakes (to elevate pods 1–2 feet off the ground for airflow).
- ○ Gloves (optional but recommended—some hyacinth pods can be dusty or irritating!).
- ● Labeling tags (to track varieties if collecting multiple types).
- ● Fine-mesh strainer (for sifting seeds from chaff post-release).
- ● Desiccant packets (to reduce moisture in storage bags if saving seeds long-term).
- ● Camera or sketchbook (to document pod development for future reference!).
How to collect hyacinth seeds naturally without manual extraction
Skip the fuss—let nature do the work with this effortless method for harvesting hyacinth seeds.
🌱 Step 1: Identify and Leave Mature Seed Pods on the Plant
Wait until the hyacinth flowers have completely faded and the seed pods turn a dry, papery brown color—this signals full maturity. The pods will feel crisp to the touch and split open naturally when ready. I always check pods in late summer or early fall, depending on your climate zone.
Leave the pods attached to the plant stem until they begin splitting open on their own. This typically happens within 1-2 weeks after turning brown. If you harvest too early, the seeds won't be fully developed. The key is patience—don't rush this stage, as premature pods won't yield viable seeds.
🌿 Step 2: Create a Collection Tray Under the Plant
Place a shallow tray or container (like a 9x13-inch baking pan) beneath the seed pods to catch the released seeds. I use a white plastic container because it makes the tiny black seeds stand out against the background. Position the tray so it's directly under the pods but doesn't touch the plant stem.
Hyacinth seeds are tiny—about the size of a pinhead—so a flat, wide surface works best. If you're working with multiple plants, use separate trays for each to avoid mixing varieties. Place the setup in a sheltered spot where wind won't scatter the seeds before you can collect them.
💧 Step 3: Wait for Natural Seed Release (No Handling Required)
Leave the pods undisturbed for 7-10 days while they continue drying and eventually split open. The seeds will fall into the tray naturally as the pods crack. You'll know it's working when you see a fine dusting of tiny black seeds accumulating in the tray—this is the most satisfying part of the process.
Don't attempt to shake or tap the pods to release seeds prematurely. The natural drying process ensures the seeds are fully mature and ready for planting. If rain is forecasted, bring the tray indoors temporarily to protect the collected seeds from moisture.
✂️ Step 4: Clean and Store the Collected Seeds
Once the pods have fully released their seeds, carefully remove the tray and transfer the seeds to a paper towel or fine mesh screen. Gently sift through the debris to separate the seeds from any remaining pod fragments or plant matter. Hyacinth seeds are lightweight, so a soft breeze or gentle tapping will help separate them.
Store the clean seeds in a small envelope or airtight container with a desiccant packet to prevent moisture buildup. Label the container with the variety and collection date, then place it in a cool, dry location. Hyacinth seeds remain viable for 1-2 years when stored properly—this makes them perfect for long-term garden planning.
☀️ Step 5: Plant the Seeds for Future Blooms
Sow the collected seeds in late fall or early winter for spring germination. Plant them ¼ inch deep in well-draining soil, spacing them 1 inch apart in a prepared seedbed or small pots. Keep the soil consistently moist but not waterlogged until germination occurs, which typically takes 4-6 weeks.
Hyacinth seedlings grow slowly at first, so don't be discouraged if progress seems slow. Once they develop 2-3 true leaves, you can transplant them to their permanent location. This method ensures you'll have fresh hyacinths blooming in just 2-3 years, making it a rewarding long-term project.
Tips & tricks for perfect hyacinth seed collection
This hands-off method transforms seed harvesting from a fussy task into a relaxing garden ritual—here's how to optimize every step.
Pod Maturity Check: In Step 1, the crispness test is your best indicator—run your thumbnail along the pod's seam. It should feel like dry parchment paper, not fibrous or moist. I've learned the hard way that pods still slightly green inside won't release viable seeds, no matter how long you wait. The 1-2 week window after turning brown is critical for full maturity.
Tray Selection Strategy: For Step 2, avoid using dark-colored containers—they'll make the black seeds nearly invisible. A white or light-colored 9x13-inch baking pan works perfectly, but you could also use a ceramic tile or even a piece of white poster board in a pinch. Position the tray slightly angled so seeds roll toward one edge for easier collection. This simple adjustment prevents seeds from getting lost in corners.
Weather-Proofing: When setting up in Step 3, place your collection station near a covered porch or under a tree canopy. A sudden rainstorm can ruin weeks of work by washing seeds away or causing premature mold growth. I keep a clear plastic tablecloth handy to quickly cover the setup if unexpected showers roll in. The 7-10 day waiting period gives you time to monitor weather forecasts and adjust accordingly.
Seed Storage Secret: For Step 4, I've found that adding a small silica gel packet to your storage container extends viability beyond the standard 1-2 years. These packets are often included in shoe boxes or electronics packaging. Place the packet inside the container before sealing—it absorbs moisture without affecting the seeds. Label your container with both the variety name AND collection date to track germination rates over time.
Pro Tips for Hyacinth Seed Pods
- This hands-off method transforms seed harvesting from a fussy task into a relaxing garden ritual—here's how to optimi...
- Pod Maturity Check: In Step 1, the crispness test is your best indicator—run your thumbnail along the pod's seam. It ...
- Tray Selection Strategy: For Step 2, avoid using dark-colored containers—they'll make the black seeds nearly invisibl...
Frequently asked questions
Got questions about hyacinth seed pods? You’re not alone—these unique blooms spark curiosity! Here are answers to the most common queries to help you navigate seed collection like a pro.
When do hyacinth seed pods form?
Hyacinth seed pods develop after the flowers bloom and fade—typically 4–6 weeks post-flowering. Look for pods that turn from green to brown and dry out; this signals they’re ready for harvesting. Pro tip: If your climate is humid, pods may take longer to dry.
How long do hyacinth seed pods take to open?
Once fully dried, pods usually open within 1–2 weeks on their own, releasing seeds naturally. If they linger closed, try gently tapping them or placing them in a paper bag for 24 hours to encourage release. Patience is key!
Can I collect seeds from store-bought hyacinths?
Yes, but results vary. Store-bought hyacinths may be hybrids (sterile) or grown from seed. For guaranteed seeds, opt for open-pollinated varieties or grow from seed pods of garden-grown plants. Check the bulb’s label for seed viability clues!
What if my seed pods rot or mold?
Overly damp conditions cause rot. To prevent this:
- Harvest pods when fully dry (no moisture inside).
- Store them in a cool, dry place (like a mesh bag).
- Avoid high humidity—never store in plastic.
How do I know if the seeds are viable?
Viable seeds are plump, firm, and dark (not shriveled or hollow). For a quick test, place a few in water:
- Sinkers: Likely viable.
- Floaters: Discard or save for crafting.
Wrapping up and next steps
Hyacinth seed pods offer a hands-off, rewarding way to expand your garden naturally—no fuss, just beauty! By understanding their lifecycle and timing, you can enjoy effortless propagation while adding vibrant blooms to your outdoor space. 🌱
Ready to try it? Start small—plant a few pods in a pot or garden bed this season and watch your hyacinths multiply! Share your progress with fellow gardeners or explore more seed-saving tips to keep your green thumb growing.