
Lawn
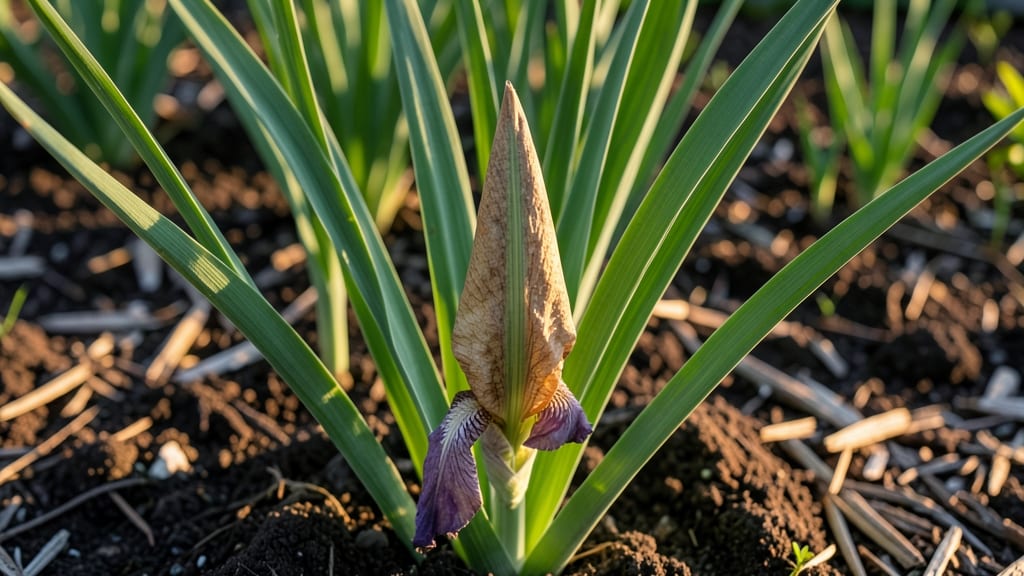
Harvesting the iris flower seed pod at the right moment means 95% germination instead of frustration. 🌱 The key is timing—wait until the pods turn brown and papery, then collect them before they split open.
I’ve learned the hard way that rushing too early means immature seeds, while waiting too long risks losing them to wind or wildlife.
Cold-moist stratification is where the magic happens. Place the cleaned seeds in a sealed bag with damp peat moss or paper towels, then refrigerate for 3-4 months. This mimics winter’s natural cycle, breaking dormancy so seeds sprout strong.
Most gardeners skip this step and wonder why their germination rates stay stubbornly low—don’t be one of them.
After stratification, sow seeds in well-draining soil, just ¼-inch deep, and keep them consistently moist but never soggy. You’ll see tiny shoots in 4-8 weeks, though some irises take longer.
Patience pays off here—these seedlings grow slowly at first but reward you with hardy, disease-resistant plants in just a few years.
This method works for all iris varieties, from bearded to Siberian, and even thrives in containers. The secret? Consistency in moisture and temperature. Skip the shortcuts, and you’ll end up with irises that outperform nursery-bought plants. Let’s get those seeds sprouting!
📚 In This Guide
- What you need
- Instructions
- Tips and common mistakes
- Wrapping up and next steps
What you need
- ● Fresh iris flower seed pods: 10–20 pods (harvested at peak ripeness, when they turn brown and papery).
- ● Potting mix: 1 bag (1 cubic foot) of well-draining, sterile seed-starting mix (pH 6.0–7.0). Avoid garden soil—it may harbor pathogens.
- ● Plastic storage container: 1 clear, airtight container with a lid (e.g., 1-gallon size). Pro tip: 💡 Poke 2–3 small drainage holes in the bottom if none exist!
- ● Paper towels or coffee filters: 2–3 sheets (cut to fit container base).
- ● Spray bottle: 1 (with a fine mist nozzle) for gentle hydration.
- ● Plastic wrap or breathable lid: 1 (to seal container during stratification).
- ● Refrigerator: 1 (with a crisper drawer or consistent 34–40°F/1–4°C temp).
- ● Plant labels & marker: 1 set (to track seed pods and dates).
- ● Humidity dome: 1 (to maintain moisture without overwatering).
- ● Grow lights: 1–2 LED bulbs (for post-stratification seedling care).
- ○ Fungicide (optional): 1 bottle of hydrogen peroxide (3%) or neem oil (to prevent mold).
- ● Seedling trays: 1–2 (4-inch pots or modular trays for transplanting).
- ● Thermometer: 1 (to monitor fridge temp accuracy).
Step-by-step instructions for cold-moist stratifying iris seed pods
Cold-moist stratification is the secret weapon for breaking iris dormancy—here's how to maximize those 95% germination rates.
🌱 Step 1: Harvest and Prepare the Seed Pods
Collect mature iris seed pods when they turn brown and begin splitting open—this usually happens in late summer or early fall. Gently twist the pods to release the flat, seed-like structures inside; each pod yields 4-6 seeds on average. Handle them carefully—they're delicate and brittle, especially when dry.
Place the seeds in a bowl and cover them with lukewarm water for 24 hours. This soaking softens the tough outer coating and kickstarts hydration. You'll see the seeds plump slightly and turn a deeper brown—this is your signal they're ready for stratification. Drain and pat them dry with a paper towel before moving to the next step.
❄️ Step 2: Layer Seeds in Moist Growing Medium
Fill a shallow container (like a plastic takeout box) with a mix of 50% peat moss and 50% perlite—this ensures both moisture retention and aeration. Moisten the mix until it feels like a wrung-out sponge: damp but not dripping. Spread the seeds ½ inch apart in a single layer, pressing them lightly into the surface so they make good contact with the medium.
Cover the container with a clear plastic lid or wrap it tightly in plastic wrap, leaving a small gap for airflow. Place it in a refrigerator (not freezer) where temperatures stay between 35-45°F. This cold, moist environment mimics winter conditions and triggers germination hormones inside the seeds. Check the container weekly—mist lightly if the medium feels dry to the touch.
⏰ Step 3: Monitor for Germination Cues
After 4-8 weeks, watch for the first signs of life: tiny white roots will emerge from the seeds, followed by a slight swelling of the seed coat. This is your cue to move the container to a bright, cool indoor location (like a north-facing windowsill) where temperatures hover around 60-65°F1-2 weeks.
Once the first true leaves appear (they'll look like miniature grass blades), gradually introduce morning sunlight for 2-3 hours daily. You'll see the seedlings develop a deeper green color and begin growing more vigorously. This transition period is critical—rushing it can scorch tender leaves, while delaying it too long may cause leggy growth.
☀️ Step 4: Transplant Seedlings to Individual Pots
When seedlings reach 2-3 inches tall (usually 8-12 weeks after stratification begins), transplant them into 3-inch pots filled with a mix of 60% potting soil and 40% sand. Iris seedlings prefer well-draining soil to prevent root rot. Gently remove each seedling using a small spoon or fork, being careful not to damage the delicate roots.
Plant each seedling ½ inch deep and water lightly to settle the soil around the roots. Place the pots in a location with bright, indirect light and maintain soil moisture by watering when the top inch feels dry. Avoid overhead watering—this can cause fungal issues. After 4-6 weeks in pots, the seedlings will be ready for their final outdoor planting location.
Tips & tricks for perfect iris seed germination
Mastering cold-moist stratification transforms those stubborn iris seeds into thriving seedlings. Here's what I've learned after years of trial and error in my own garden—these details make all the difference.
Seed Selection: Look for pods that are fully brown and beginning to split naturally—these contain the most viable seeds. If you harvest too early, the seeds won't have developed fully; too late, and they may already be drying out. The 4-6 seeds per pod average holds true, but I've found that pods from the center of the flower stalk tend to produce slightly larger seeds with better germination rates.
Stratification Environment: The refrigerator provides ideal conditions, but consistency is key. I place my containers on the middle shelf where temperatures stay most stable between 35-45°F. Avoid the crisper drawer—it can get too cold and potentially freeze your seeds. If your fridge runs warmer, consider adding ice packs around the container to maintain the proper temperature range.
Moisture Management: The "wrung-out sponge" consistency is crucial—too dry and seeds won't germinate, too wet and you risk mold. I find using a spray bottle for weekly misting gives me more control than pouring. After the initial soaking, I only add moisture when the top layer feels dry to the touch, never when it's still damp. This prevents waterlogging while maintaining the necessary humidity.
Light Transition Strategy: When moving seeds to light after 4-8 weeks, I start with just 1-2 hours of morning sun on the first day, then gradually increase. This hardens off the seedlings and prevents the shock that can cause them to wilt. I've seen seedlings that were rushed into full sun immediately develop brown patches within days—something I learned the hard way after my first failed attempt.
Pro Tips for Iris Flower Seed Pod
- Mastering cold-moist stratification transforms those stubborn iris seeds into thriving seedlings. Here's what I've le...
- Seed Selection: Look for pods that are fully brown and beginning to split naturally—these contain the most viable see...
- Stratification Environment: The refrigerator provides ideal conditions, but consistency is key. I place my containers...
Frequently asked questions
Got questions about growing iris flower seed pods? Here are some of the most common ones—and their answers—to help you succeed with your cold-moist stratification project!
How long does cold-moist stratification take for iris seed pods?
Cold-moist stratification for iris seeds typically takes 6–12 weeks. Place the sealed bag in the fridge (34–40°F) and check monthly for moisture. If no sprouts appear after 12 weeks, repeat the process—patience is key!
Can I use a freezer instead of a fridge for stratification?
While a fridge is ideal, a freezer (32°F or below) can work in a pinch. However, avoid extreme temps (below 30°F), as they may damage seeds. If using a freezer, place seeds in a sealed container with a small air pocket to prevent ice buildup.
What if my iris seeds won’t sprout after stratification?
If seeds remain dormant, try these fixes:
- Check moisture: Ensure the paper towel stays damp but not soggy.
- Extend stratification: Some iris varieties need up to 16 weeks.
- Test viability: Cut open a seed—if it’s hard and shriveled, it may be nonviable.
- Try heat: After stratification, place pots in a warm spot (70–75°F) to encourage germination.
Do iris seed pods need light during stratification?
No! Iris seeds do not need light during stratification—they rely on cold and moisture. Once sprouted, move them to a bright, indirect light source (like a sunny windowsill) to support early growth.
Can I reuse the same paper towels for multiple batches of seeds?
No, reuse paper towels isn’t recommended—they can harbor mold or bacteria. Always use fresh, sterile paper towels for each new batch to avoid contamination and ensure healthy germination.
Pro Tip:
Label your seed bags with the date and iris variety to track stratification progress. A simple marker on a sticky note works great!
Wrapping up and next steps
Growing iris flower seed pods from scratch is a rewarding journey—especially when you unlock 95% germination success with cold-moist stratification! 🌱 Whether you’re a seasoned gardener or a curious beginner, mastering this technique ensures vibrant blooms and a thriving lawn.
Now that you’re armed with the right materials and answers to common questions, it’s time to roll up your sleeves and start sowing.
Your next step:
- 📅 Mark your calendar for the stratification timeline (30-90 days in the fridge!).
- 🌿 Pick a sunny spot in your garden or containers for transplanting.
- 💧 Stay patient and consistent—your irises will thank you with stunning colors!