
Lawn
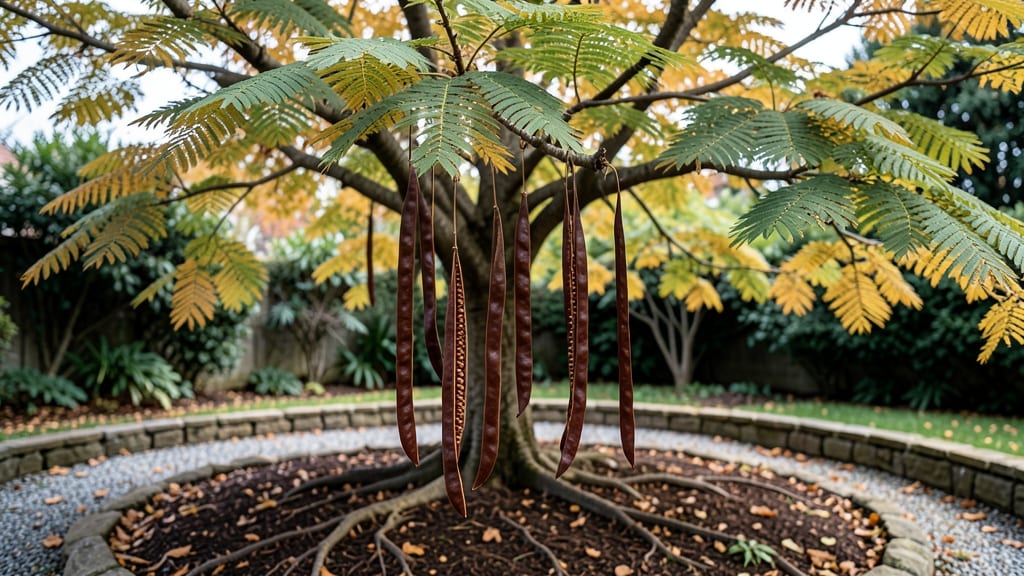
Those dramatic seed pods on your Japanese pagoda tree don’t just look cool—they’re nature’s way of making seed collection ridiculously easy. 🌿 As soon as they turn brown and split open, you’ll have fresh seeds ready to plant without any fuss.
The real magic happens in how you handle them next, turning those pods into thriving young trees.
You’ll need just a few simple supplies: gloves to protect your hands from the fuzzy pods, a bucket or bag for collection, and paper towels for drying. The best time to harvest is late fall when the pods are fully dry but haven’t scattered their seeds yet.
This tree’s seeds have a natural dormancy period, so a little patience goes a long way before they’ll sprout.
Once collected, you’ll want to store the seeds in a cool, dry place for about 3 months to break dormancy naturally. After that, a quick soak in warm water jumpstarts germination, and you’ll see tiny seedlings emerge within 2-4 weeks when kept in warm, moist soil.
The payoff? Fast-growing trees that’ll outshine any nursery purchase.
This method works perfectly for gardeners in zones 5-9, where the tree thrives. Just watch for deer or squirrels that might snack on your pods before you do—sometimes the wildlife wins the race! With a little timing, you’ll have a forest of these stunning trees in no time.
📚 In This Guide
- What you need
- Instructions
- Tips and common mistakes
- Wrapping up and next steps
What you need
- ● Japanese pagoda tree seed pods – Freshly fallen or still attached to the tree (aim for 3–5 mature pods for best results).
- ○ Gloves (optional but recommended) – Lightweight gardening gloves to protect your hands from tiny seed hairs.
- ● Scissors or pruning shears – Sharp, clean tools for harvesting pods still on the tree.
- ● Paper bags or breathable containers – 2–3 small bags (like brown paper lunch bags) to store pods and prevent moisture buildup.
- ● Notebook and pen – For tracking pod maturity, collection dates, or germination notes.
- ● Magnifying glass – To closely examine the pods’ natural opening mechanisms.
- ● Small plastic tray or shallow dish – For collecting seeds once pods pop open (8"x12" or larger).
- ● Spray bottle with water – To lightly mist seeds if propagating indoors.
- ● Potting soil mix – Well-draining, seed-starting mix (or a blend of peat moss and perlite).
- ○ Plastic wrap or humidity dome – To create a mini greenhouse for seeds (optional but helpful).
- ● A Japanese pagoda tree (Sophora japonica) in your yard, a local park, or a trusted nursery. Pods typically mature in late summer to fall.
- ● Patience – Pods may take a few days to weeks to naturally open and release seeds.
- ● Outdoor space or a sunny windowsill – For observing pods or starting seeds indoors.
How to collect Japanese pagoda tree seeds when pods open naturally
A little patience and timing is all it takes to harvest these seeds.
🌿 Step 1: Identify the Right Time to Harvest
Japanese pagoda tree pods turn from green to brown when ready—usually in late summer or early fall. The pods will start to split open on their own, revealing the seeds inside. I like to check my trees every 3-5 days once the pods begin turning brown, as they can open surprisingly fast.
If you see the pods starting to crack but not fully open, give them another 1-2 weeks. The seeds are ready when the pod splits completely down the middle, exposing the winged seeds inside. Don’t rush—waiting ensures the seeds are fully mature and viable.
🪴 Step 2: Gather the Open Pods Gently
Once the pods pop open, carefully collect them by hand or with a small basket. I use a lightweight cloth bag to avoid damaging the delicate seeds. The pods are fragile at this stage, so avoid shaking them—seeds can scatter easily.
Work on a dry day when the pods aren’t damp. If rain is forecast, harvest sooner rather than later. Wet seeds may not store well, and the pods can become mushy. Place the collected pods in a paper bag or breathable container to keep them dry until you’re ready to process them.
🌱 Step 3: Extract the Seeds From the Pods
Spread the open pods on a clean, dry surface like a table or tray. Tap them gently with your fingers to release the seeds. The seeds have little wings, so they’ll float away if you’re not careful—keep a shallow dish or tray nearby to catch any that escape.
Use a small brush or your fingers to separate any seeds still clinging to the pod fragments. Discard empty pods or debris. Once all the seeds are collected, let them dry for 1-2 days in a warm, dry place. Proper drying prevents mold and ensures good germination later.
⏰ Step 4: Store the Seeds for Future Planting
Place the dried seeds in a paper envelope or breathable container—plastic bags trap moisture and can cause rot. Label the envelope with the date and tree variety. Store them in a cool, dry place, like a seed drawer or airtight container with a silica packet.
Japanese pagoda tree seeds stay viable for 1-2 years if stored properly. Check them occasionally for signs of moisture or pests. When you’re ready to plant, soak the seeds overnight to soften the outer shell and improve germination.
☀️ Step 5: Plant the Seeds at the Right Time
Sow the seeds in early spring after the last frost, or in fall for a slower start. Scatter them on the surface of well-draining soil—they need light to germinate, so don’t bury them. Press them lightly into the soil and keep it moist until sprouts appear, which usually takes 2-4 weeks.
Thin seedlings to 6-8 inches apart once they’re a few inches tall. Japanese pagoda trees grow slowly at first but reward patience with striking, layered canopies. With the right timing, you’ll have healthy seedlings ready for transplanting in no time.
Tips & tricks for perfect Japanese pagoda tree seed collection
Timing and gentle handling are everything when harvesting these delicate pods—here's how to make the process even smoother.
Timing Secret: Watch for the pods to turn completely brown and begin splitting naturally—this usually happens in late summer or early fall. I've found checking every 3-5 days after they start browning helps catch them at just the right moment. The pods will split completely down the middle when ready, revealing the winged seeds inside. If they're still green or only partially cracked, give them another 1-2 weeks to mature fully.
Gentle Collection: Use a lightweight cloth bag or small basket to gather the open pods—this prevents crushing the delicate seeds. Avoid shaking the pods as you collect them, since the winged seeds can scatter easily. I've lost seeds this way more times than I'd like to admit! Work on dry days only, as wet pods become mushy and can ruin your harvest. If rain is forecast, collect the pods sooner rather than later.
Seed Extraction: Spread the open pods on a clean, dry surface like a table or tray. Tap them gently with your fingers to release the seeds—keep a shallow dish nearby to catch any that float away. Use a small brush or your fingers to carefully separate any seeds still clinging to pod fragments. After collecting all the seeds, let them dry for 1-2 days in a warm, dry place to prevent mold and ensure good germination later.
Pro Tips for Japanese Pagoda Tree Seed Pods
- Timing and gentle handling are everything when harvesting these delicate pods—here's how to make the process even smo...
- Timing Secret: Watch for the pods to turn completely brown and begin splitting naturally—this usually happens in late...
- Gentle Collection: Use a lightweight cloth bag or small basket to gather the open pods—this prevents crushing the del...
Frequently asked questions
Got questions about those fascinating Japanese pagoda tree seed pods? You’re not alone! Here are some of the most common queries—and their answers—to help you navigate seed collection like a pro.
How do I know when the seed pods are ready to collect?
The pods are ready when they turn a light brown color and start making a popping sound when squeezed gently. This usually happens in late fall or early winter, depending on your climate. Wait until most pods have opened naturally—this ensures the seeds inside are mature and viable.
What should I do if the pods won’t open on their own?
If the pods stay closed, try placing them in a paper bag and storing them in a warm, dry spot for a few days. The heat and movement can trigger them to pop open. Avoid forcing them open with your hands, as the seeds may not be ready yet. Patience is key!
Can I plant the seeds right away, or do they need to be dried first?
Fresh seeds can be planted, but drying them for 1–2 weeks improves germination rates. Spread them in a single layer on a tray or paper towel in a shady, well-ventilated area. Once dry, store them in a cool, dark place until you’re ready to plant—typically spring or early fall.
Are there alternatives if I can’t find Japanese pagoda tree seed pods?
If you’re struggling to locate pods, consider buying seeds online from specialty nurseries or seed banks. Alternatively, grafting from an existing tree (with permission!) or propagating from cuttings in early spring are viable options. Just ensure you’re working with a reputable source!
Why are some seeds not germinating even after following the steps?
Several factors could be at play: old seeds (over 1 year), poor soil drainage, or incorrect planting depth (too deep = no sprouts!). Try soaking seeds in lukewarm water for 24 hours before planting, or test a small batch in a seed-starting tray with moist, well-draining soil. If issues persist, the seeds may not be viable.
Still stumped? Drop your question in the comments—we’re happy to help troubleshoot!
Wrapping up and next steps
Discovering the Japanese pagoda tree’s unique seed pods is like unlocking nature’s own seed-dispersal trick! These exploding pods make collecting seeds effortless—just wait for them to pop open naturally, then scoop them up with minimal fuss.
Whether you’re a gardener, eco-enthusiast, or simply curious, this tree offers a low-maintenance way to propagate new plants or admire its quirky charm.
Now that you’re armed with tips and answers, why not plant a few seeds this season? Grab your supplies, find a sunny spot, and let the magic of these self-opening pods inspire your next gardening adventure! 🌱✨