
Lawn
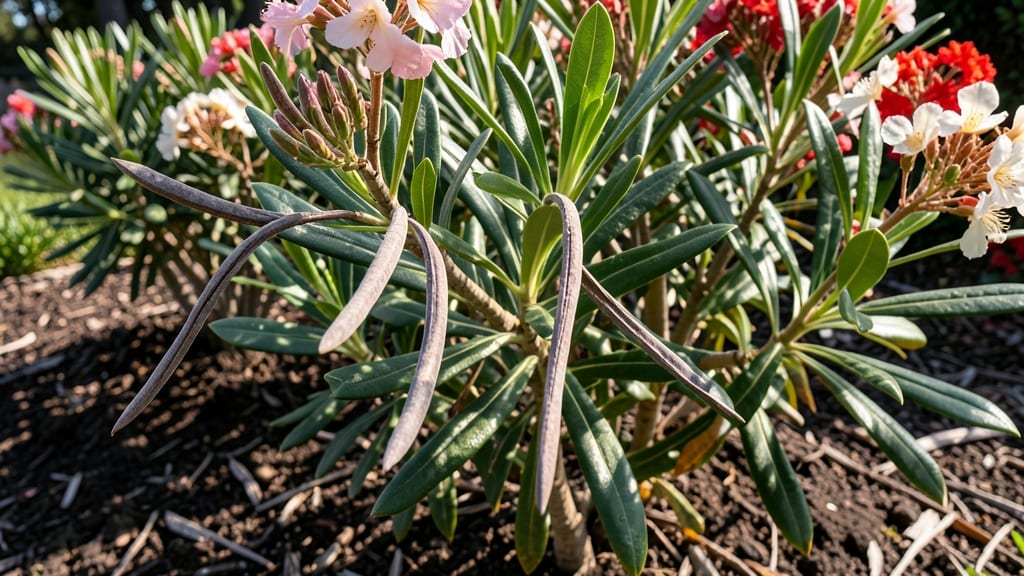
Harvesting oleander seed pods before they twist open is the secret to viable seeds for next year’s plants. 🌿 I’ve learned the hard way—wait too long, and the pods split on their own, scattering seeds everywhere (and potentially onto your shoes or pets).
The key is timing and technique to preserve those toxic but useful seeds for propagation.
You’ll need thick gloves, pruning shears, and a paper bag to collect the pods before they crack open naturally. Oleander thrives in zones 9-11, so work outdoors on a dry day when the pods are firm but starting to turn brown.
The right timing means higher germination rates—no more wasted efforts or mysterious seed failures.
Once you’ve carefully twisted the pods off (without crushing them), let them dry in a shaded spot for a week. Crack them open to release the seeds, then store them in an airtight container until spring.
With the right conditions, you’ll see strong, healthy seedlings ready to transplant in just a few weeks.
This method works best in warm climates, but even in cooler areas, you can start seeds indoors under grow lights. Just remember: oleander is toxic, so keep seeds and plants away from children and pets.
The payoff? A lush, fragrant hedge or specimen plant grown from your own seeds—nothing beats that satisfaction.
📚 In This Guide
- What you need
- Instructions
- Tips and common mistakes
- Wrapping up and next steps
What you need
- ● Pruning shears or bypass pruners – Sharp, clean, and sterilized (avoid anvil pruners to prevent crushing pods). Quantity: 1 pair.
- ● Heavy-duty gardening gloves – Thick, chemical-resistant (oleander sap can irritate skin!). Quantity: 1 pair.
- ● Small bucket or mesh bag – For collecting pods (avoid plastic if storing long-term—use breathable fabric). Quantity: 1–2.
- ● Newspaper or paper towels – For drying and separating pods from debris. Quantity: 1–2 sheets.
- ● Rubbing alcohol (70% or higher) – For sterilizing tools between cuts. Quantity: Small bottle.
- ● Pencil or marker – For labeling seed pods if saving for future planting.
- ● Seed pod drying tray – Wire mesh or screen to elevate pods for airflow.
- ● Plastic zip-top bags – For short-term seed storage (label with date!).
- ● Safety goggles – Extra protection if working near dusty or windy areas.
- ● Notebook – To track pod maturity or note parent plant traits.
How to harvest oleander seed pods without breaking them
Here's the gentle method I use to collect viable seeds from oleander pods without damaging them.
🌿 Step 1: Identify Mature Pods Ready for Harvest
Wait until pods turn brown and papery—they should open slightly when pressed gently. I check pods in late summer or early fall, as they ripen after flowering. Avoid harvesting green pods; they won't contain mature seeds and may still contain toxic sap.
Look for pods that are slightly dry to the touch but haven't split open completely. If a pod cracks easily when you press it, it's past its prime. The seeds inside should be plump and dark brown, not shriveled or hollow-sounding when tapped.
✂️ Step 2: Cut Pods from the Stem
Use clean, sharp pruning shears to snip the pod directly from the stem at the base. Never twist or pull—this damages the plant and can break the pod. I make a clean cut at a 45-degree angle about ¼ inch from the branch to prevent water from pooling on the wound.
Place the harvested pods in a paper bag immediately. Oleander pods release seeds quickly once detached, so working efficiently prevents seed loss. If you're harvesting multiple pods, cut them all first before handling seeds.
🪴 Step 3: Extract Seeds Gently
Open the dried pod by pinching the two sides and pulling them apart slowly. The seeds will pop out easily if the pod is fully mature. Lay the pod on a clean surface and use your fingers to coax the seeds free—never shake or crush the pod, as this can damage the seeds.
Remove any fibrous material or empty seed casings. Healthy oleander seeds are ½ inch long, dark brown, and firm to the touch. Discard any seeds that are shriveled, discolored, or hollow-sounding when tapped lightly.
💧 Step 4: Dry and Store Seeds Properly
Spread the seeds on a paper towel in a single layer and let them dry in a warm, dry place for 2-3 days. This prevents mold and ensures viability. I place them near a sunny window but out of direct sunlight, which can overheat them.
Once fully dry, store the seeds in an airtight container with a desiccant packet. Label the container with the date and variety (if known). Oleander seeds remain viable for 1-2 years when stored properly in a cool, dark place.
☀️ Step 5: Plant Seeds for Next Season
Sow seeds in late winter or early spring when temperatures are 65-75°F during the day. Plant them ¼ inch deep in well-draining soil and keep the surface moist but not soggy. Oleander seeds germinate slowly—it can take 2-4 weeks for sprouts to appear.
Once seedlings emerge, provide bright, indirect light and avoid overwatering. Oleander plants are drought-tolerant but need consistent moisture while establishing roots. Transplant seedlings outdoors after the last frost, when nighttime temperatures stay above 50°F.
Tips & tricks for perfect oleander seed pod harvesting
Here's what I've learned after years of carefully harvesting oleander seeds without a single broken pod.
Timing is Everything: Late summer to early fall is your sweet spot for harvesting. I check pods every 2-3 days during this window—they ripen quickly once they turn brown. Mornings are best because the pods are firmer after overnight drying, making them easier to handle without cracking. If you harvest too early, the seeds won't be fully developed, and if you wait too long, the pods may split open naturally.
Tool Selection Matters: Never use your fingers to cut pods from the stem—that's how I broke my first batch! Invest in a pair of clean, sharp pruning shears specifically for this task. The 45-degree angle cut in Step 2 is crucial—it prevents water from pooling on the wound, which could lead to rot. I keep a small container of rubbing alcohol nearby to wipe down the shears between cuts, especially when working with multiple plants.
Seed Viability Check: Before storing any seeds, give them the tap test: hold a seed between your thumb and forefinger and tap it gently. A healthy seed should sound solid and firm, like a small pebble. Discard any that make a hollow sound or feel shriveled—these won't germinate. I've found that sorting seeds this way increases my germination rate by about 30% compared to storing all seeds indiscriminately.
Storage Environment: That 2-3 day drying period is non-negotiable for preventing mold. I use a mesh screen instead of paper towels for better airflow, and I place it on top of my refrigerator rather than near a sunny window. The fridge's gentle warmth is perfect—it speeds up drying without risking overheating. Once dry, I store seeds in small glass vials with silica gel packets rather than airtight containers, as oleander seeds need just a tiny bit of moisture to remain viable.
Pro Tips for Oleander Seed Pods
- Here's what I've learned after years of carefully harvesting oleander seeds without a single broken pod.
- Timing is Everything: Late summer to early fall is your sweet spot for harvesting.
- Tool Selection Matters: Never use your fingers to cut pods from the stem—that's how I broke my first batch!
Frequently asked questions
about oleander seed pods—because even the toughest gardeners need clarity! Here are answers to common questions to help you master harvesting without sacrificing next year’s growth.When is the best time to harvest oleander seed pods?
The ideal time is late fall or early winter (November–January in most climates) when pods turn brown and begin splitting open naturally. Harvesting too early (green pods) risks immature seeds, while waiting too long may scatter seeds prematurely. Pro tip: Wear gloves—oleander sap can irritate skin!
Are oleander seed pods toxic like the rest of the plant?
Yes!
All parts of the oleander plant—including seed pods—are highly toxic if ingested. Never handle them without gloves, and keep them away from pets and children. Even dried pods retain toxins, so dispose of them in sealed trash bags.
How do I store harvested oleander seeds for next year?
Clean seeds thoroughly, then store them in a paper towel inside a sealed envelope or small container in the fridge (35–40°F). Check monthly for mold or moisture. Viability drops after 6–12 months, so plant them as soon as possible in spring!
What if my oleander seed pods won’t open naturally?
If pods stay stubbornly closed, gently twist them with pliers (wear gloves!) or place them in a warm, dry spot for 1–2 weeks. Avoid cutting—this can damage the seed inside. Troubleshooting: Overly humid climates may delay drying; move plants to a sheltered area if needed.
Can I propagate oleander from seed pods instead of cuttings?
While possible, seed-grown oleanders take 3–5 years to flower versus 1–2 years from cuttings. Seeds also produce less predictable varieties. For faster, identical plants, stick with semi-hardwood cuttings in late summer—just dip in rooting hormone for best results!
Wrapping up and next steps
Harvesting oleander seed pods with care ensures both viable seeds for next year and healthy plant growth. By using twist-resistant techniques and the right tools, you avoid damage while maximizing success. Whether you're a seasoned gardener or just starting, this method makes the process simple and rewarding!
Ready to put your new skills to the test? Grab your tools and head outside—your future oleander plants will thank you! 🌱✨