
Size
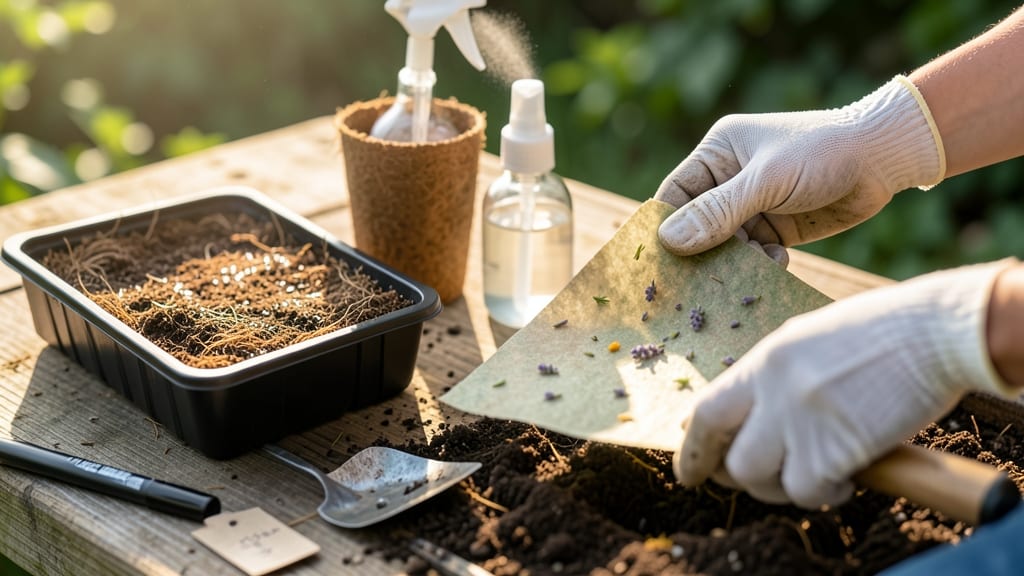
Growing seed paper transforms trash into blooming beauty—no soil, no mess, just pure magic. 🌱 I’ve turned old book pages and coffee filters into wildflower gardens that sprout in days, not weeks.
The secret lies in those three layers: seeds, pulp, and patience. What starts as a fragile sheet becomes a vibrant garden decoration or edible herb patch with just water and sunlight.
You only need three things: seed paper (store-bought or homemade), a shallow tray, and distilled water—no fancy tools required. Press the paper into damp soil or float it in water, and watch roots unfurl within 3-7 days.
The best part? You can grow these anywhere: hanging planters, window boxes, or even as temporary garden markers. My kids still giggle every time they see "instant flowers" appear from what looked like paper scraps.
By week three, you’ll have lush, blooming seedlings ready to transplant or enjoy as-is. The flowers attract pollinators, the herbs add fresh flavor, and the whole process teaches kids (or adults) how seeds work—without the fuss of traditional planting.
Even if some seeds lag behind, the uneven sprouting just adds charm to your zero-waste garden art.
Troubleshooting is simple: too much water? Let it dry slightly. Too little? Mist gently. And if mold appears, just rinse the paper and start fresh. The possibilities are endless—wedding confetti, memorial keepsakes, or a living thank-you note. Let’s get those seeds blooming!
📚 In This Guide
- What you need
- Instructions
- Tips and common mistakes
- Wrapping up and next steps
What you need
- ● Seeds: Choose fast-growing, easy-to-germinate seeds like wildflower mixes, basil, marigolds, or sunflowers. Use 1 tsp (5g) per sheet of standard 8.5”x11” paper.
- ● Unbleached paper pulp: Use 100% post-consumer waste paper (e.g., printer paper, egg cartons, or newspaper). Avoid glossy or coated papers. 1 sheet per batch (torn into strips).
- ● Water: 1 cup (240ml) for soaking and mixing.
- ○ Natural glue (optional but recommended): Use flaxseed gel, cornstarch paste, or 1 tbsp (15g) wheat flour + ½ cup (120ml) water as a binder.
- ● Blender or food processor: To turn paper into pulp.
- ● Mixing bowl: A stainless steel or glass bowl (avoid plastic for eco-friendliness).
- ● Silicone baking mat or parchment paper: For drying your seed paper (size: at least 12”x15”).
- ● Rolling pin or smooth wooden spoon: To flatten the mixture evenly.
- ● Fine-mesh strainer or cheesecloth: To remove excess water.
- ○ Spray bottle (optional): For light misting if the paper dries too fast.
- ● 🌡️ Temperature check: Work in a warm (70–75°F/21–24°C) space for faster drying.
- ● ✨ Seed variety: Mix 3–5 types of seeds for a vibrant, pollinator-friendly result!
- ● 🔥 Storage: Keep finished seed paper in a cool, dry place until ready to plant.
Step-by-Step instructions for crafting seed paper
Here's how I transform recycled paper into vibrant, plantable blooms—no gardening experience needed.
🌱 Step 1: Blend Paper and Seeds into a Pulp
Tear 4 sheets of recycled paper into 1-inch squares and soak them in 4 cups of warm water for 10-15 minutes until fully saturated. Drain excess water, then transfer the soaked paper to a blender with 1 cup of water. Add 1 tablespoon of wildflower seeds—I like a mix of cosmos, bachelor's buttons, and zinnias for quick, cheerful blooms.
Blend on high for 20-30 seconds until you get a smooth, thick pulp consistency. It should hold together when pressed between your fingers but still be workable. If it's too dry, add ½ cup of water at a time. The goal is a paste that coats your mold evenly without dripping.
💧 Step 2: Press Pulp into a Mold for Even Drying
Line a 9x12-inch baking sheet with parchment paper, then pour the pulp mixture into your seed paper mold (or a flat, shallow container). Spread it evenly with a spatula, pressing firmly to remove air bubbles. The layer should be about ⅛-inch thick—thicker sheets take longer to dry and may crack.
Let the sheet dry completely in a shady, well-ventilated area for 24-48 hours. You'll know it's ready when it peels away cleanly from the mold and feels stiff but pliable. Avoid direct sunlight or heat sources—uneven drying causes warping. I prop mine up on a drying rack to ensure airflow on both sides.
✂️ Step 3: Cut and Store for Planting
Once fully dry, carefully lift the sheet from the mold and cut it into 4 equal squares (about 4.5x6 inches each) using a sharp knife or paper cutter. Fold each square in half and store in a sealed plastic bag with a damp paper towel to maintain moisture. Keep in a cool, dark place until ready to plant—seeds stay viable for 6-12 months this way.
When planting, simply press the seed paper into prepared soil, seeds-side down, and water gently. The paper will biodegrade naturally, nourishing the soil as your flowers emerge. I plant mine in spring after the last frost, spacing squares 6 inches apart for full sun exposure. You'll see sprouts in 7-14 days—just water lightly until established.
☀️ Step 4: Maintain for Maximum Blooms
After planting, keep the soil consistently moist but not soggy—seed paper breaks down fastest in 60-70°F temperatures with moderate moisture. You'll notice the paper disintegrating within 4-6 weeks, leaving only healthy seedlings. Thin plants to 4-6 inches apart if overcrowding occurs.
Fertilize lightly with a balanced organic fertilizer when flowers first appear to encourage robust blooms. Deadhead spent flowers to prolong the season. Here's the thing—these flowers grow fast but don't last forever, so enjoy them while they bloom! I always plant extra squares for cutting or to share with neighbors.
Tips & tricks for perfect seed paper
Transforming recycled paper into plantable seed paper is simpler than you think—these pro tips ensure your blooms thrive from the very first layer.
Paper Selection Matters: Use uncoated, non-glossy recycled paper like printer paper or junk mail—avoid paper with plastic coatings or heavy inks, which can inhibit seed germination. I've found that newsprint works beautifully because it breaks down quickly in soil. If you're using colored paper, opt for water-based inks only, as oil-based inks may contain chemicals harmful to seeds.
Seed Layering Technique: When blending your pulp in Step 1, distribute the 1 tablespoon of wildflower seeds evenly throughout the mixture rather than adding them all at once. This ensures each square of seed paper contains a balanced mix of seeds, leading to more uniform blooms. For best results, I recommend using seeds with similar germination times—like cosmos, bachelor's buttons, and zinnias—to ensure they all sprout together.
Drying Secrets for Success: The 24-48 hour drying time in Step 2 is critical, but don't rush it! Uneven drying causes cracks or warping, which can prevent seeds from making contact with soil. I like to place my drying rack near a fan on low setting to create gentle airflow. If you live in a humid climate, extend drying time to 48 hours—a stiff but pliable sheet is your goal. Test for readiness by gently peeling a corner: if it separates cleanly, it's ready.
Storage Wisdom: To maintain seed viability for the full 6-12 months mentioned in Step 3, store your seed paper squares in a sealed plastic bag with a damp paper towel. The moisture keeps seeds from drying out, while the sealed bag prevents mold. I also add a small packet of silica gel to absorb excess moisture—just remove it before planting. Keep the bag in a cool, dark place like a pantry or fridge to slow down seed aging.
Pro Tips for Grow Seed Paper
- Transforming recycled paper into plantable seed paper is simpler than you think—these pro tips ensure your blooms thrive from the very first layer.
- Paper Selection Matters: Use uncoated, non-glossy recycled paper like printer paper or junk mail—avoid paper with plastic coatings or heavy inks, which can inhibit seed germination.
- Seed Layering Technique: When blending your pulp in Step 1, distribute the 1 tablespoon of wildflower seeds evenly throughout the mixture rather than adding them all at once.
Frequently asked questions
Got questions about growing seed paper?
You’re not alone! Here are answers to the most common queries to help you turn your eco-friendly paper into vibrant blooms with ease.
How long does it take for seed paper to grow flowers?
Seed paper typically sprouts within 7–14 days after planting, depending on the seed type and environmental conditions. Most flowers bloom in 4–8 weeks, though some may take longer. Patience is key—keep the soil moist and watch your green thumb work its magic!
Do I need special soil or fertilizer for seed paper?
Nope! Use regular potting soil or a seed-starting mix. Seed paper seeds are pre-treated for germination, so they don’t need extra fertilizer at first. Once sprouts appear, a light dose of organic compost or diluted liquid fertilizer (like fish emulsion) can give them a boost.
What if my seed paper doesn’t sprout? Troubleshooting tips?
Don’t worry—try these fixes:
- Check moisture: Keep soil consistently damp (not soggy) by misting daily.
- Light matters: Place in bright, indirect sunlight (or under grow lights).
- Patience: Some seeds (like wildflowers) germinate slower. Wait 3–4 weeks before replacing.
- Seed viability: Store seed paper in a cool, dry place—old or improperly stored paper may fail to sprout.
Can I grow seed paper indoors?
Use a sunny windowsill or grow lights to mimic outdoor conditions. Opt for fast-growing varieties like basil, marigolds, or nasturtiums. A shallow tray with drainage holes works perfectly—just keep the soil moist and rotate the tray for even light exposure.
What can I do with leftover seed paper?
Don’t toss it! Try these creative uses:
- Plant as confetti at weddings or parties.
- Make seed paper garlands for decorations.
- Store in a ziplock bag for future planting (keep dry!).
- Compost it if it’s too damaged—it’ll still nourish your soil!
Can I plant seed paper in winter?
Yes, but choose cold-hardy seeds like pansies, snapdragons, or hardy herbs. Plant in well-draining soil and protect seedlings with a cloche or row cover if frost is expected. Alternatively, start them indoors under grow lights and transplant later.
Wrapping up and next steps
Growing seed paper is a rewarding way to turn waste into wildflowers while embracing sustainability! With just three layers—seeds, paper pulp, and water—you’ve unlocked a creative, eco-friendly project that blooms with purpose.
Whether you’re crafting gifts, beautifying gardens, or teaching kids about nature, your seed paper is ready to spread joy (and roots!) everywhere.
Now that you’re armed with knowledge, take the next step: plant your creations and watch them transform into vibrant blooms. Share your progress with the world—tag us @EcoBlooms and inspire others to grow with you! 🌱✨