
Lawn
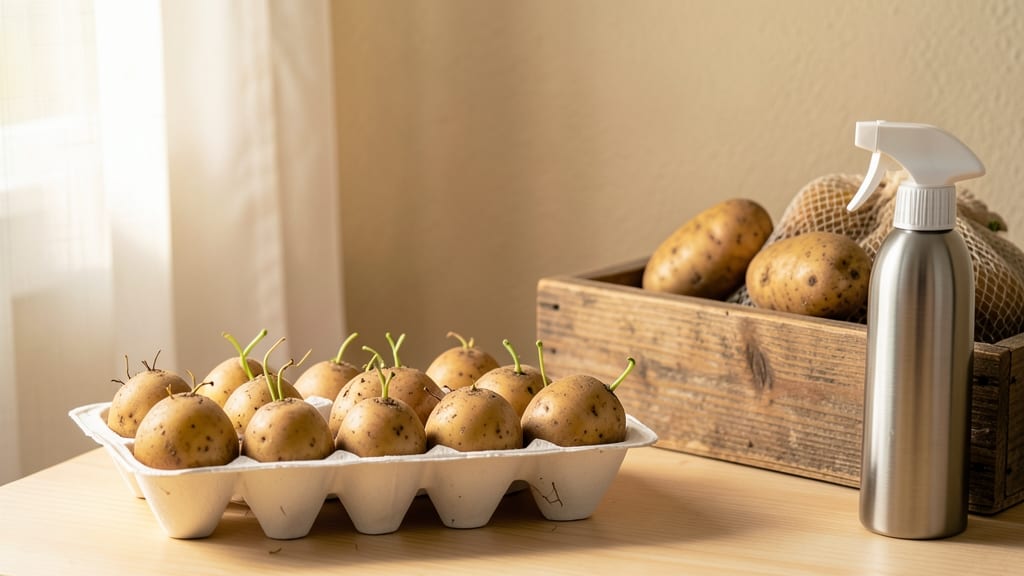
Pre-sprouting seed potatoes gives you a head start on the growing season—stronger plants, earlier harvests, and fewer surprises when it's time to plant. 🌱 I learned the hard way that skipping this step means waiting weeks longer for those first delicious tubers, and sometimes dealing with weak, leggy plants that struggle to establish.
The secret lies in coaxing those little sprouts indoors before the last frost, turning your seed potatoes into powerhouses ready to hit the garden running.
You only need a few simple supplies: seed potatoes (certified disease-free), a bright spot near a window or under grow lights, and a little patience.
Place your potatoes in a tray or egg carton with the sprouts facing up, and keep them in a cool, dark spot for 2-3 weeks while they develop sturdy 1-inch sprouts.
The magic happens when you move them to indirect light—this prevents the sprouts from stretching too tall and weak before they hit the soil. Most gardeners see 2-3 times faster growth in their pre-sprouted potatoes compared to planting bare tubers.
Once your sprouts are ready, you’ll notice they’re thicker and more vibrant, with a network of tiny roots already forming. These plants hit the garden with confidence, establishing deeper and faster than their unsprouted counterparts.
The payoff? Heavier yields, fewer pests, and a harvest that arrives 3-4 weeks earlier than traditional planting. Imagine pulling your first new potatoes in June instead of July—now that’s what I call a game-changer.
This method works for both early and late varieties, though timing matters: start chitting 6-8 weeks before your last frost date. If you live in a shorter growing season, this is your secret weapon for squeezing every possible day out of the season.
Just watch for rot—keep the environment dry and well-ventilated—and avoid overcrowding the sprouts. With these simple steps, you’ll be well on your way to a bountiful, foolproof potato patch.
📚 In This Guide
- What you need
- Instructions
- Tips and common mistakes
- Wrapping up and next steps
What you need
- ● Seed potatoes: Choose certified disease-free, organic seed potatoes (not grocery-store spuds!). Aim for 1–2 lbs (0.5–1 kg) per 10 sq ft of garden space. Popular varieties include Yukon Gold, Red Pontiac, or Fingerlings.
- ● Cardboard egg cartons or paper towels: For sprouting (use 1–2 cartons or 4–6 sheets of paper towels, depending on quantity).
- ● Plastic storage bags: Opt for resealable, gallon-sized bags (2–4 bags, depending on volume).
- ● Water: Room-temperature, not chlorinated (let tap water sit out for 24 hours if needed).
- ● Sharp knife or potato cutter: For cutting larger seed potatoes (use only if needed; smaller ones sprout faster!).
- ● Spray bottle: Keeps sprouting materials lightly moist without drowning them.
- ● Bright, cool location: A basement, garage, or sunny windowsill (50–60°F / 10–15°C is ideal).
- ○ Garden twine or rubber bands: To secure bags loosely (optional, for airflow).
- ● Garden journal or labels: Track varieties and sprouting dates (helpful for large batches!).
Step-by-Step instructions for pre-sprouting seed potatoes
Here's my foolproof method for jump-starting your potatoes—stronger starts mean bigger yields.
🌱 Step 1: Select and Prepare Your Seed Potatoes
Choose certified disease-free seed potatoes (not grocery store potatoes—they're treated to prevent sprouting). Look for medium-sized tubers with at least 2-3 eyes (the dimples where sprouts emerge). I like to pick ones with firm, unblemished skin—soft spots rot during sprouting.
Cut larger tubers into 2-3 inch pieces, ensuring each has at least one eye. Let the cut surfaces air-dry for 24 hours before storing. This prevents rot and gives the wounds time to callus over. I use a clean, sharp knife and wipe it with rubbing alcohol between cuts to avoid contamination.
🌿 Step 2: Create an Ideal Sprouting Environment
Place your seed potatoes in a cardboard box or paper bag (plastic traps too much moisture). Store them in a cool, dark location like a basement or garage where temperatures stay between 35-45°F. This chilling period—about 4-6 weeks—encourages strong, uniform sprouts.
Check weekly for moisture buildup—condensation speeds up rot. If you see dampness, open the container slightly or add a few paper towels to absorb excess moisture. You'll know it's working when short, stubby sprouts appear—these are your stolons, the future stems.
☀️ Step 3: Move to Light for Vigorous Growth
Once sprouts reach 1-2 inches tall, transfer the potatoes to a bright, cool spot (still below 60°F). I use a sunny windowsill or under grow lights for 12-14 hours daily. Avoid direct sun—it can scorch tender sprouts. You'll see them lengthen and green up, which means they're ready for planting.
Discard any tubers that develop soft, mushy sprouts or blackened eyes—these won't grow well. Healthy sprouts should be firm, white, and about pencil-thick. If your sprouts grow too leggy (thin and stretched), they need more light or cooler temps.
⏰ Step 4: Time Your Planting for Peak Growth
Plant your pre-sprouted potatoes 2-3 weeks before your last frost date—they grow fast once in the ground. Dig trenches 6-8 inches deep and space tubers 12-15 inches apart in rows 3 feet apart. Bury them 4 inches deep, with the sprouts facing up (they'll grow toward light).
Mound soil around the sprouts to encourage more tubers to form along the stem. Water gently after planting—not too much, not too little—just enough to settle the soil. You'll know you're ready when the first true leaves appear above ground, signaling the real growth phase has begun.
Tips & tricks for perfect pre-sprouting seed potatoes
Took me years of trial and error to perfect this process—here's what actually makes the difference between weak, spindly sprouts and strong, vigorous growth.
Selection Tip: In Step 1, when choosing your seed potatoes, prioritize tubers with deep purple or red skin—these varieties (like Yukon Gold or Red Pontiac) tend to sprout more reliably than white potatoes. The key is those 2-3 eyes should be sunken but not sunken-in (too deep means the sprout will struggle to emerge). I've found that potatoes with smaller, clustered eyes produce more uniform sprouts than those with single large eyes.
The Chilling Factor: The 4-6 week chilling period at 35-45°F is non-negotiable for breaking dormancy. I've tried cutting this time down to save patience, but the sprouts always come back weak and inconsistent. Use a thermometer to monitor temperature—any warmer than 45°F and you'll get leggy, weak sprouts. Pro tip: Place a small fan near your storage container to circulate air without creating drafts—this prevents moisture buildup while maintaining even temperatures.
Light Transition Strategy: When moving to light in Step 3, don't rush it! Gradually increase light exposure over 3-4 days before full sun. I start with 4-6 hours of indirect light on day one, then add 2 more hours each subsequent day. This hardens the sprouts so they don't get sunburned when you finally move them to the 12-14 hour daily light regimen. Watch for the first green tips—that's your signal they're photosynthesizing properly.
Planting Readiness Check: Before planting, do this quick test: Gently pinch the longest sprout—if it snaps cleanly (not mushy) and the base feels firm but pliable, it's ready. I've planted potatoes with too-soft sprouts before, and they always rot in the ground. Also, make sure the eyes are still white (not green)—green eyes mean the sprout has been exposed to too much light already and may not root properly.
Pro Tips for Pre Sprouting Seed Potatoes
- Took me years of trial and error to perfect this process—here's what actually makes the difference between weak, spindly sprouts and strong, vigorous growth.
- Selection Tip: In Step 1, when choosing your seed potatoes, prioritize tubers with deep purple or red skin—these varieties (like Yukon Gold or Red Pontiac) tend to sprout more reliably than white potatoes.
- The Chilling Factor: The 4-6 week chilling period at 35-45°F is non-negotiable for breaking dormancy.
Frequently asked questions
Got questions about pre-sprouting seed potatoes?
You’re not alone! Here are answers to the most common queries to help you grow a thriving potato patch with ease.
Why should I pre-sprout my seed potatoes instead of planting them directly?
Pre-sprouting gives your potatoes a head start on growth! When planted with small sprouts (called "chits"), they emerge faster and produce stronger plants. This means earlier harvests and better yields—especially in cooler climates. Think of it as giving your spuds a cozy, chilled wake-up call before the big move outdoors!
How long does it take for seed potatoes to sprout before planting?
Most seed potatoes sprout in 3–6 weeks when stored in a cool, bright spot (like a basement or garage). Aim for 1–2 inch (2.5–5 cm) sprouts before planting. Over-sprouting (long, leggy growth) can happen in warm conditions—just trim them back to 1–2 inches to keep energy focused on roots. Patience is key!
Can I use store-bought potatoes as seed potatoes?
Technically yes, but it’s not recommended. Store-bought potatoes are treated to prevent sprouting and may carry diseases. Seed potatoes are certified disease-free and bred for growth. If you’re in a pinch, choose organic potatoes (untreated) and soak them in a 10% bleach solution (1 part bleach to 9 parts water) for 20 minutes to reduce risks.
What if my seed potatoes don’t sprout at all?
Don’t panic! Try these fixes:
- Check storage conditions: They need cool (40–50°F / 4–10°C) temps and indirect light—no direct sunlight or warmth.
- Test viability: Cut one open—if it’s firm and white (not green or mushy), it’s still good!
- Boost humidity: Place them in a paper bag with a damp towel for a few days.
Do I need to do anything special when planting pre-sprouted potatoes?
Not much! Plant them eye-end up (sprouts facing upward) in loose, well-draining soil, about 4–6 inches deep. Space them 12–15 inches apart in rows 3 feet apart. Water gently after planting, and avoid disturbing the sprouts. Once they’re in the ground, they’ll take off like a rocket!
Can I pre-sprout potatoes in warm climates?
Yes, but adjust your timing. In warm areas, sprouts can grow too fast indoors, becoming weak. Instead:
- Start sprouting 4–6 weeks before the last frost (earlier than cooler climates).
- Use a cool room (like a basement) to slow growth.
- Plant earlier (as soon as soil is workable) to avoid leggy sprouts.
Wrapping up and next steps
Pre-sprouting your seed potatoes is a simple yet powerful way to give your garden a head start! By encouraging early growth indoors, you’ll enjoy stronger plants, higher yields, and healthier harvests—all with minimal extra effort.
Whether you’re a seasoned gardener or just starting, this method makes planting fast, fun, and foolproof.
Ready to take the next step? Grab your seed potatoes, follow the steps, and watch your garden thrive! 🌱✨ Check out our planting guide for the full timeline and pro tips to maximize success.